OAuth 2.0 資源伺服器不透明令牌
內省的最小依賴項
如 JWT 的最小依賴項 中所述,大多數資源伺服器支援都集中在 spring-security-oauth2-resource-server 中。但是,除非提供了自定義的 OpaqueTokenIntrospector,否則資源伺服器將回退到 SpringOpaqueTokenIntrospector。這意味著只需要 spring-security-oauth2-resource-server 就可以擁有一個支援不透明不記名令牌的最小工作資源伺服器。
內省的最小配置
通常,不透明令牌可以透過授權伺服器託管的 OAuth 2.0 內省端點 進行驗證。當需要撤銷時,這會非常方便。
使用 Spring Boot 時,將應用程式配置為使用內省的資源伺服器包括兩個基本步驟。首先,包括所需的依賴項;其次,指明內省端點詳細資訊。
指定授權伺服器
要指定內省端點在哪裡,只需執行以下操作
spring:
  security:
    oauth2:
      resourceserver:
        opaquetoken:
          introspection-uri: https://idp.example.com/introspect
          client-id: client
          client-secret: secret
其中 idp.example.com/introspect 是您的授權伺服器託管的內省端點,client-id 和 client-secret 是訪問該端點所需的憑據。
資源伺服器將使用這些屬性進行進一步的自配置,並隨後驗證傳入的 JWT。
| 使用內省時,授權伺服器的說法就是法律。如果授權伺服器響應令牌有效,那麼它就是有效的。 |
就是這樣!
執行時預期
應用程式啟動後,資源伺服器將嘗試處理包含 Authorization: Bearer 頭的任何請求
GET / HTTP/1.1
Authorization: Bearer some-token-value # Resource Server will process this
只要指示了此方案,資源伺服器就會嘗試根據不記名令牌規範處理請求。
給定一個不透明令牌,資源伺服器將
-
使用提供的憑據和令牌查詢提供的內省端點
-
檢查響應中是否存在
{ 'active' : true }屬性 -
將每個範圍對映到帶有字首
SCOPE_的許可權
預設情況下,生成的 Authentication#getPrincipal 是 Spring Security OAuth2AuthenticatedPrincipal 物件,如果存在,Authentication#getName 對映到令牌的 sub 屬性。
從這裡,您可能需要跳轉到
不透明令牌身份驗證的工作原理
接下來,讓我們看看 Spring Security 用於支援 servlet 應用程式(就像我們剛剛看到的那個)中的 不透明令牌 身份驗證的架構元件。
OpaqueTokenAuthenticationProvider 是一個 AuthenticationProvider 實現,它利用 OpaqueTokenIntrospector 來驗證不透明令牌。
讓我們看看 OpaqueTokenAuthenticationProvider 在 Spring Security 中是如何工作的。該圖解釋了 讀取不記名令牌 中的 AuthenticationManager 的工作細節。
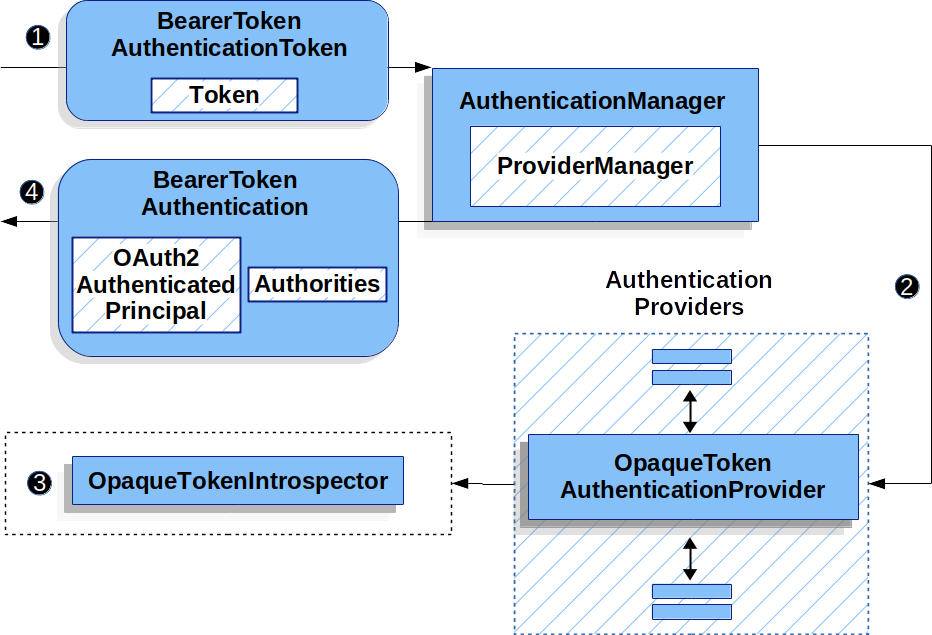
OpaqueTokenAuthenticationProvider 用法![]() 讀取不記名令牌 中的身份驗證
讀取不記名令牌 中的身份驗證 Filter 將 BearerTokenAuthenticationToken 傳遞給由 ProviderManager 實現的 AuthenticationManager。
![]()
ProviderManager 配置為使用型別為 OpaqueTokenAuthenticationProvider 的 AuthenticationProvider。
![]()
OpaqueTokenAuthenticationProvider 使用 OpaqueTokenIntrospector 內省不透明令牌並新增授予的許可權。當身份驗證成功時,返回的 Authentication 型別為 BearerTokenAuthentication,其 principal 是由配置的 OpaqueTokenIntrospector 返回的 OAuth2AuthenticatedPrincipal,並且具有至少包含 FACTOR_BEARER 的一組許可權。最終,返回的 BearerTokenAuthentication 將由身份驗證 Filter 設定在 SecurityContextHolder 上。
身份驗證後查詢屬性
令牌透過身份驗證後,BearerTokenAuthentication 例項將設定在 SecurityContext 中。
這意味著在使用 @EnableWebMvc 進行配置時,它在 @Controller 方法中可用
-
Java
-
Kotlin
@GetMapping("/foo")
public String foo(BearerTokenAuthentication authentication) {
    return authentication.getTokenAttributes().get("sub") + " is the subject";
}
@GetMapping("/foo")
fun foo(authentication: BearerTokenAuthentication): String {
return authentication.tokenAttributes["sub"].toString() + " is the subject"
}由於 BearerTokenAuthentication 持有 OAuth2AuthenticatedPrincipal,這也意味著它也適用於控制器方法
-
Java
-
Kotlin
@GetMapping("/foo")
public String foo(@AuthenticationPrincipal OAuth2AuthenticatedPrincipal principal) {
    return principal.getAttribute("sub") + " is the subject";
}
@GetMapping("/foo")
fun foo(@AuthenticationPrincipal principal: OAuth2AuthenticatedPrincipal): String {
return principal.getAttribute<Any>("sub").toString() + " is the subject"
}透過 SpEL 查詢屬性
當然,這也意味著可以透過 SpEL 訪問屬性。
例如,如果使用 @EnableGlobalMethodSecurity 以便可以使用 @PreAuthorize 註解,則可以這樣做
-
Java
-
Kotlin
@PreAuthorize("principal?.attributes['sub'] == 'foo'")
public String forFoosEyesOnly() {
    return "foo";
}
@PreAuthorize("principal?.attributes['sub'] == 'foo'")
fun forFoosEyesOnly(): String {
return "foo"
}覆蓋或替換 Boot 自動配置
Spring Boot 代表資源伺服器生成了兩個 @Bean。
第一個是 SecurityFilterChain,它將應用程式配置為資源伺服器。當使用不透明令牌時,此 SecurityFilterChain 看起來像
-
Java
-
Kotlin
@Bean
public SecurityFilterChain filterChain(HttpSecurity http) throws Exception {
    http
        .authorizeHttpRequests((authorize) -> authorize
            .anyRequest().authenticated()
        )
        .oauth2ResourceServer((oauth2) -> oauth2
            .opaqueToken(Customizer.withDefaults())
        );
    return http.build();
}
@Bean
open fun filterChain(http: HttpSecurity): SecurityFilterChain {
http {
authorizeHttpRequests {
authorize(anyRequest, authenticated)
}
oauth2ResourceServer {
opaqueToken { }
}
}
return http.build()
}如果應用程式不暴露 SecurityFilterChain bean,則 Spring Boot 將暴露上述預設的 bean。
替換它就像在應用程式中暴露 bean 一樣簡單
-
Java
-
Kotlin
import static org.springframework.security.oauth2.core.authorization.OAuth2AuthorizationManagers.hasScope;

@Configuration
@EnableWebSecurity
public class MyCustomSecurityConfiguration {
    @Bean
    public SecurityFilterChain filterChain(HttpSecurity http) throws Exception {
        http
            .authorizeHttpRequests((authorize) -> authorize
                .requestMatchers("/messages/**").access(hasScope("message:read"))
                .anyRequest().authenticated()
            )
            .oauth2ResourceServer((oauth2) -> oauth2
                .opaqueToken((opaqueToken) -> opaqueToken
                    .introspector(myIntrospector())
                )
            );
        return http.build();
    }
}
import org.springframework.security.oauth2.core.authorization.OAuth2AuthorizationManagers.hasScope;
@Configuration
@EnableWebSecurity
class MyCustomSecurityConfiguration {
@Bean
open fun filterChain(http: HttpSecurity): SecurityFilterChain {
http {
authorizeHttpRequests {
authorize("/messages/**", hasScope("SCOPE_message:read"))
authorize(anyRequest, authenticated)
}
oauth2ResourceServer {
opaqueToken {
introspector = myIntrospector()
}
}
}
return http.build()
}
}上述程式碼要求任何以 /messages/ 開頭的 URL 都具有 message:read 範圍。
oauth2ResourceServer DSL 上的方法也將覆蓋或替換自動配置。
例如,Spring Boot 建立的第二個 @Bean 是一個 OpaqueTokenIntrospector,它將 String 令牌解碼為經過驗證的 OAuth2AuthenticatedPrincipal 例項
-
Java
-
Kotlin
@Bean
public OpaqueTokenIntrospector introspector() {
    return SpringOpaqueTokenIntrospector.withIntrospectionUri(introspectionUri)
            .clientId(clientId).clientSecret(clientSecret).build();
}
@Bean
fun introspector(): OpaqueTokenIntrospector {
return SpringOpaqueTokenIntrospector.withIntrospectionUri(introspectionUri)
.clientId(clientId).clientSecret(clientSecret).build()
}如果應用程式沒有暴露 OpaqueTokenIntrospector bean,那麼 Spring Boot 將暴露上述預設的 bean。
並且其配置可以透過 introspectionUri() 和 introspectionClientCredentials() 進行覆蓋,或者透過 introspector() 進行替換。
如果應用程式不暴露 OpaqueTokenAuthenticationConverter bean,那麼 spring-security 將構建 BearerTokenAuthentication。
或者,如果您根本不使用 Spring Boot,那麼所有這些元件——過濾器鏈、OpaqueTokenIntrospector 和 OpaqueTokenAuthenticationConverter——都可以在 XML 中指定。
過濾器鏈指定如下
-
Xml
<http>
    <intercept-uri pattern="/**" access="authenticated"/>
    <oauth2-resource-server>
        <opaque-token introspector-ref="opaqueTokenIntrospector"
                authentication-converter-ref="opaqueTokenAuthenticationConverter"/>
    </oauth2-resource-server>
</http>
而 OpaqueTokenIntrospector 則指定如下
-
Xml
<bean id="opaqueTokenIntrospector"
        class="org.springframework.security.oauth2.server.resource.introspection.SpringOpaqueTokenIntrospector">
    <constructor-arg value="${spring.security.oauth2.resourceserver.opaquetoken.introspection_uri}"/>
    <constructor-arg value="${spring.security.oauth2.resourceserver.opaquetoken.client_id}"/>
    <constructor-arg value="${spring.security.oauth2.resourceserver.opaquetoken.client_secret}"/>
</bean>
而 OpaqueTokenAuthenticationConverter 則指定如下
-
Xml
<bean id="opaqueTokenAuthenticationConverter"
        class="com.example.CustomOpaqueTokenAuthenticationConverter"/>
使用 introspectionUri()
授權伺服器的內省 URI 可以 作為配置屬性 進行配置,也可以在 DSL 中提供
-
Java
-
Kotlin
-
Xml
@Configuration
@EnableWebSecurity
public class DirectlyConfiguredIntrospectionUri {
    @Bean
    public SecurityFilterChain filterChain(HttpSecurity http) throws Exception {
        http
            .authorizeHttpRequests((authorize) -> authorize
                .anyRequest().authenticated()
            )
            .oauth2ResourceServer((oauth2) -> oauth2
                .opaqueToken((opaqueToken) -> opaqueToken
                    .introspectionUri("https://idp.example.com/introspect")
                    .introspectionClientCredentials("client", "secret")
                )
            );
        return http.build();
    }
}
@Configuration
@EnableWebSecurity
class DirectlyConfiguredIntrospectionUri {
@Bean
open fun filterChain(http: HttpSecurity): SecurityFilterChain {
http {
authorizeHttpRequests {
authorize(anyRequest, authenticated)
}
oauth2ResourceServer {
opaqueToken {
introspectionUri = "https://idp.example.com/introspect"
introspectionClientCredentials("client", "secret")
}
}
}
return http.build()
}
}<bean id="opaqueTokenIntrospector"
class="org.springframework.security.oauth2.server.resource.introspection.SpringOpaqueTokenIntrospector">
<constructor-arg value="https://idp.example.com/introspect"/>
<constructor-arg value="client"/>
<constructor-arg value="secret"/>
</bean>使用 introspectionUri() 優先於任何配置屬性。
使用 introspector()
比 introspectionUri() 更強大的是 introspector(),它將完全取代任何 Boot 自動配置的 OpaqueTokenIntrospector
-
Java
-
Kotlin
-
Xml
@Configuration
@EnableWebSecurity
public class DirectlyConfiguredIntrospector {
    @Bean
    public SecurityFilterChain filterChain(HttpSecurity http) throws Exception {
        http
            .authorizeHttpRequests((authorize) -> authorize
                .anyRequest().authenticated()
            )
            .oauth2ResourceServer((oauth2) -> oauth2
                .opaqueToken((opaqueToken) -> opaqueToken
                    .introspector(myCustomIntrospector())
                )
            );
        return http.build();
    }
}
@Configuration
@EnableWebSecurity
class DirectlyConfiguredIntrospector {
@Bean
open fun filterChain(http: HttpSecurity): SecurityFilterChain {
http {
authorizeHttpRequests {
authorize(anyRequest, authenticated)
}
oauth2ResourceServer {
opaqueToken {
introspector = myCustomIntrospector()
}
}
}
return http.build()
}
}<http>
<intercept-uri pattern="/**" access="authenticated"/>
<oauth2-resource-server>
<opaque-token introspector-ref="myCustomIntrospector"/>
</oauth2-resource-server>
</http>暴露一個 OpaqueTokenIntrospector @Bean
或者,暴露一個 OpaqueTokenIntrospector @Bean 具有與 introspector() 相同的效果
@Bean
public OpaqueTokenIntrospector introspector() {
    return return SpringOpaqueTokenIntrospector.withIntrospectionUri(introspectionUri)
            .clientId(clientId).clientSecret(clientSecret).build();
}
配置授權
OAuth 2.0 內省端點通常會返回一個 scope 屬性,指示授予的範圍(或許可權),例如
{ …, "scope" : "messages contacts"}
在這種情況下,資源伺服器將嘗試將這些範圍強制轉換為授予許可權列表,為每個範圍新增字首字串 "SCOPE_"。
這意味著要使用不透明令牌派生的範圍保護端點或方法,相應的表示式應包含此字首
-
Java
-
Kotlin
-
Xml
import static org.springframework.security.oauth2.core.authorization.OAuth2AuthorizationManagers.hasScope;

@Configuration
@EnableWebSecurity
public class MappedAuthorities {
    @Bean
    public SecurityFilterChain filterChain(HttpSecurity http) throws Exception {
        http
            .authorizeHttpRequests((authorizeRequests) -> authorizeRequests
                .requestMatchers("/contacts/**").access(hasScope("contacts"))
                .requestMatchers("/messages/**").access(hasScope("messages"))
                .anyRequest().authenticated()
            )
            .oauth2ResourceServer((oauth2) -> oauth2
                .opaqueToken(Customizer.withDefaults())
            );
        return http.build();
    }
}
import org.springframework.security.oauth2.core.authorization.OAuth2AuthorizationManagers.hasScope
@Configuration
@EnableWebSecurity
class MappedAuthorities {
@Bean
open fun filterChain(http: HttpSecurity): SecurityFilterChain {
http {
authorizeHttpRequests {
authorize("/contacts/**", hasScope("contacts"))
authorize("/messages/**", hasScope("messages"))
authorize(anyRequest, authenticated)
}
oauth2ResourceServer {
opaqueToken { }
}
}
return http.build()
}
}<http>
<intercept-uri pattern="/contacts/**" access="hasAuthority('SCOPE_contacts')"/>
<intercept-uri pattern="/messages/**" access="hasAuthority('SCOPE_messages')"/>
<oauth2-resource-server>
<opaque-token introspector-ref="opaqueTokenIntrospector"/>
</oauth2-resource-server>
</http>或者類似地使用方法安全
-
Java
-
Kotlin
@PreAuthorize("hasAuthority('SCOPE_messages')")
public List<Message> getMessages(...) {}
@PreAuthorize("hasAuthority('SCOPE_messages')")
fun getMessages(): List<Message?> {}手動提取許可權
預設情況下,不透明令牌支援將從內省響應中提取 scope 宣告並將其解析為單獨的 GrantedAuthority 例項。
例如,如果內省響應是
{
    "active" : true,
    "scope" : "message:read message:write"
}
那麼資源伺服器將生成一個具有兩個許可權的 Authentication,一個用於 message:read,另一個用於 message:write。
當然,這可以透過使用自定義的 OpaqueTokenIntrospector 進行自定義,該內省器會檢視屬性集並以自己的方式進行轉換
-
Java
-
Kotlin
public class CustomAuthoritiesOpaqueTokenIntrospector implements OpaqueTokenIntrospector {
    private OpaqueTokenIntrospector delegate = SpringOpaqueTokenIntrospector
            .withIntrospectionUri("https://idp.example.org/introspect")
            .clientId("client").clientSecret("secret").build();

    public OAuth2AuthenticatedPrincipal introspect(String token) {
        OAuth2AuthenticatedPrincipal principal = this.delegate.introspect(token);
        return new DefaultOAuth2AuthenticatedPrincipal(
                principal.getName(), principal.getAttributes(), extractAuthorities(principal));
    }

    private Collection<GrantedAuthority> extractAuthorities(OAuth2AuthenticatedPrincipal principal) {
        List<String> scopes = principal.getAttribute(OAuth2IntrospectionClaimNames.SCOPE);
        return scopes.stream()
                .map(SimpleGrantedAuthority::new)
                .collect(Collectors.toList());
    }
}
class CustomAuthoritiesOpaqueTokenIntrospector : OpaqueTokenIntrospector {
private val delegate: OpaqueTokenIntrospector = SpringOpaqueTokenIntrospector
.withIntrospectionUri("https://idp.example.org/introspect")
.clientId("client").clientSecret("secret").build()
override fun introspect(token: String): OAuth2AuthenticatedPrincipal {
val principal: OAuth2AuthenticatedPrincipal = delegate.introspect(token)
return DefaultOAuth2AuthenticatedPrincipal(
principal.name, principal.attributes, extractAuthorities(principal))
}
private fun extractAuthorities(principal: OAuth2AuthenticatedPrincipal): Collection<GrantedAuthority> {
val scopes: List<String> = principal.getAttribute(OAuth2IntrospectionClaimNames.SCOPE)
return scopes
.map { SimpleGrantedAuthority(it) }
}
}此後,只需將其公開為 @Bean 即可配置此自定義內省器
-
Java
-
Kotlin
@Bean
public OpaqueTokenIntrospector introspector() {
    return new CustomAuthoritiesOpaqueTokenIntrospector();
}
@Bean
fun introspector(): OpaqueTokenIntrospector {
return CustomAuthoritiesOpaqueTokenIntrospector()
}配置超時
預設情況下,資源伺服器與授權伺服器協調時,連線超時和套接字超時各為 30 秒。
在某些情況下,這可能太短了。此外,它沒有考慮更復雜的模式,如回退和發現。
為了調整資源伺服器連線授權伺服器的方式,SpringOpaqueTokenIntrospector 接受 RestOperations 例項
-
Java
-
Kotlin
@Bean
public OpaqueTokenIntrospector introspector(RestTemplateBuilder builder, OAuth2ResourceServerProperties properties) {
    RestOperations rest = builder
            .basicAuthentication(properties.getOpaquetoken().getClientId(), properties.getOpaquetoken().getClientSecret())
            .setConnectTimeout(Duration.ofSeconds(60))
            .setReadTimeout(Duration.ofSeconds(60))
            .build();

    return SpringOpaqueTokenIntrospector(introspectionUri, rest);
}
@Bean
fun introspector(builder: RestTemplateBuilder, properties: OAuth2ResourceServerProperties): OpaqueTokenIntrospector? {
val rest: RestOperations = builder
.basicAuthentication(properties.opaquetoken.clientId, properties.opaquetoken.clientSecret)
.setConnectTimeout(Duration.ofSeconds(60))
.setReadTimeout(Duration.ofSeconds(60))
.build()
return SpringOpaqueTokenIntrospector(introspectionUri, rest)
}將內省與 JWT 結合使用
一個常見的問題是內省是否與 JWT 相容。Spring Security 的不透明令牌支援被設計為不關心令牌的格式——它會很高興地將任何令牌傳遞給所提供的內省端點。
因此,假設您有一個要求,需要在每個請求中檢查授權伺服器,以防 JWT 已被吊銷。
即使您使用 JWT 格式的令牌,您的驗證方法是內省,這意味著您需要這樣做
spring:
  security:
    oauth2:
      resourceserver:
        opaquetoken:
          introspection-uri: https://idp.example.org/introspection
          client-id: client
          client-secret: secret
在這種情況下,結果 Authentication 將是 BearerTokenAuthentication。相應 OAuth2AuthenticatedPrincipal 中的任何屬性都將是內省端點返回的任何內容。
但是,奇怪的是,內省端點只返回令牌是否活躍。現在怎麼辦?
在這種情況下,您可以建立一個自定義的 OpaqueTokenIntrospector,它仍然會訪問該端點,但隨後會將返回的 principal 更新為具有 JWT 宣告作為屬性
-
Java
-
Kotlin
public class JwtOpaqueTokenIntrospector implements OpaqueTokenIntrospector {
    private OpaqueTokenIntrospector delegate = SpringOpaqueTokenIntrospector
            .withIntrospectionUri("https://idp.example.org/introspect")
            .clientId("client").clientSecret("secret").build();
    private JwtDecoder jwtDecoder = new NimbusJwtDecoder(new ParseOnlyJWTProcessor());

    public OAuth2AuthenticatedPrincipal introspect(String token) {
        OAuth2AuthenticatedPrincipal principal = this.delegate.introspect(token);
        try {
            Jwt jwt = this.jwtDecoder.decode(token);
            return new DefaultOAuth2AuthenticatedPrincipal(jwt.getClaims(), NO_AUTHORITIES);
        } catch (JwtException ex) {
            throw new OAuth2IntrospectionException(ex);
        }
    }

    private static class ParseOnlyJWTProcessor extends DefaultJWTProcessor<SecurityContext> {
    	JWTClaimsSet process(SignedJWT jwt, SecurityContext context)
                throws JOSEException {
            return jwt.getJWTClaimsSet();
        }
    }
}
class JwtOpaqueTokenIntrospector : OpaqueTokenIntrospector {
private val delegate: OpaqueTokenIntrospector = SpringOpaqueTokenIntrospector
.withIntrospectionUri("https://idp.example.org/introspect")
.clientId("client").clientSecret("secret").build()
private val jwtDecoder: JwtDecoder = NimbusJwtDecoder(ParseOnlyJWTProcessor())
override fun introspect(token: String): OAuth2AuthenticatedPrincipal {
val principal = delegate.introspect(token)
return try {
val jwt: Jwt = jwtDecoder.decode(token)
DefaultOAuth2AuthenticatedPrincipal(jwt.claims, NO_AUTHORITIES)
} catch (ex: JwtException) {
throw OAuth2IntrospectionException(ex.message)
}
}
private class ParseOnlyJWTProcessor : DefaultJWTProcessor<SecurityContext>() {
override fun process(jwt: SignedJWT, context: SecurityContext): JWTClaimsSet {
return jwt.jwtClaimsSet
}
}
}此後,只需將其公開為 @Bean 即可配置此自定義內省器
-
Java
-
Kotlin
@Bean
public OpaqueTokenIntrospector introspector() {
    return new JwtOpaqueTokenIntrospector();
}
@Bean
fun introspector(): OpaqueTokenIntrospector {
return JwtOpaqueTokenIntrospector()
}呼叫 /userinfo 端點
一般來說,資源伺服器不關心底層使用者,而是關心已授予的許可權。
儘管如此,有時將授權語句與使用者關聯起來可能很有價值。
如果應用程式也使用 spring-security-oauth2-client 並設定了適當的 ClientRegistrationRepository,那麼使用自定義的 OpaqueTokenIntrospector 就可以非常簡單地實現。下面的實現做了三件事
-
委託給內省端點,以確認令牌的有效性
-
查詢與
/userinfo端點關聯的適當客戶端註冊 -
呼叫並返回
/userinfo端點的響應
-
Java
-
Kotlin
public class UserInfoOpaqueTokenIntrospector implements OpaqueTokenIntrospector {
    private final OpaqueTokenIntrospector delegate = SpringOpaqueTokenIntrospector
            .withIntrospectionUri("https://idp.example.org/introspect")
            .clientId("client").clientSecret("secret").build();
    private final OAuth2UserService oauth2UserService = new DefaultOAuth2UserService();

    private final ClientRegistrationRepository repository;

    // ... constructor

    @Override
    public OAuth2AuthenticatedPrincipal introspect(String token) {
        OAuth2AuthenticatedPrincipal authorized = this.delegate.introspect(token);
        Instant issuedAt = authorized.getAttribute(ISSUED_AT);
        Instant expiresAt = authorized.getAttribute(EXPIRES_AT);
        ClientRegistration clientRegistration = this.repository.findByRegistrationId("registration-id");
        OAuth2AccessToken token = new OAuth2AccessToken(BEARER, token, issuedAt, expiresAt);
        OAuth2UserRequest oauth2UserRequest = new OAuth2UserRequest(clientRegistration, token);
        return this.oauth2UserService.loadUser(oauth2UserRequest);
    }
}
class UserInfoOpaqueTokenIntrospector : OpaqueTokenIntrospector {
private val delegate: OpaqueTokenIntrospector = SpringOpaqueTokenIntrospector
.withIntrospectionUri("https://idp.example.org/introspect")
.clientId("client").clientSecret("secret").build()
private val oauth2UserService = DefaultOAuth2UserService()
private val repository: ClientRegistrationRepository? = null
// ... constructor
override fun introspect(token: String): OAuth2AuthenticatedPrincipal {
val authorized = delegate.introspect(token)
val issuedAt: Instant? = authorized.getAttribute(ISSUED_AT)
val expiresAt: Instant? = authorized.getAttribute(EXPIRES_AT)
val clientRegistration: ClientRegistration = repository!!.findByRegistrationId("registration-id")
val accessToken = OAuth2AccessToken(BEARER, token, issuedAt, expiresAt)
val oauth2UserRequest = OAuth2UserRequest(clientRegistration, accessToken)
return oauth2UserService.loadUser(oauth2UserRequest)
}
}如果您根本不使用 spring-security-oauth2-client,它仍然很簡單。您只需使用自己的 WebClient 例項呼叫 /userinfo
-
Java
-
Kotlin
public class UserInfoOpaqueTokenIntrospector implements OpaqueTokenIntrospector {
    private final OpaqueTokenIntrospector delegate = SpringOpaqueTokenIntrospector
            .withIntrospectionUri("https://idp.example.org/introspect")
            .clientId("client").clientSecret("secret").build();
    private final WebClient rest = WebClient.create();

    @Override
    public OAuth2AuthenticatedPrincipal introspect(String token) {
        OAuth2AuthenticatedPrincipal authorized = this.delegate.introspect(token);
        return makeUserInfoRequest(authorized);
    }
}
class UserInfoOpaqueTokenIntrospector : OpaqueTokenIntrospector {
private val delegate: OpaqueTokenIntrospector = SpringOpaqueTokenIntrospector
.withIntrospectionUri("https://idp.example.org/introspect")
.clientId("client").clientSecret("secret").build()
private val rest: WebClient = WebClient.create()
override fun introspect(token: String): OAuth2AuthenticatedPrincipal {
val authorized = delegate.introspect(token)
return makeUserInfoRequest(authorized)
}
}無論哪種方式,建立 OpaqueTokenIntrospector 後,您都應該將其作為 @Bean 釋出以覆蓋預設值
-
Java
-
Kotlin
@Bean
OpaqueTokenIntrospector introspector() {
    return new UserInfoOpaqueTokenIntrospector(...);
}
@Bean
fun introspector(): OpaqueTokenIntrospector {
return UserInfoOpaqueTokenIntrospector(...)
}
