授權 HttpServletRequests
Spring Security 允許您在請求級別建模您的授權。例如,透過 Spring Security,您可以宣告 /admin 下的所有頁面需要一個許可權,而所有其他頁面只需進行身份驗證。
預設情況下,Spring Security 要求每個請求都經過身份驗證。也就是說,無論何時使用HttpSecurity 例項,都必須宣告您的授權規則。
只要您有一個 HttpSecurity 例項,您至少應該這樣做:
-
Java
-
Kotlin
-
Xml
http
    .authorizeHttpRequests((authorize) -> authorize
        .anyRequest().authenticated()
    )
http {
authorizeHttpRequests {
authorize(anyRequest, authenticated)
}
}<http>
<intercept-url pattern="/**" access="authenticated"/>
</http>這告訴 Spring Security,您應用程式中的任何端點都要求安全上下文至少經過身份驗證才能允許訪問。
在許多情況下,您的授權規則將比這更復雜,因此請考慮以下用例:
-
我有一個使用
authorizeRequests的應用程式,我想將其遷移到authorizeHttpRequests -
我想匹配請求,並且我將 Spring MVC 對映到非預設 Servlet 的東西
-
我想授權請求
-
我想將請求授權委託給策略代理
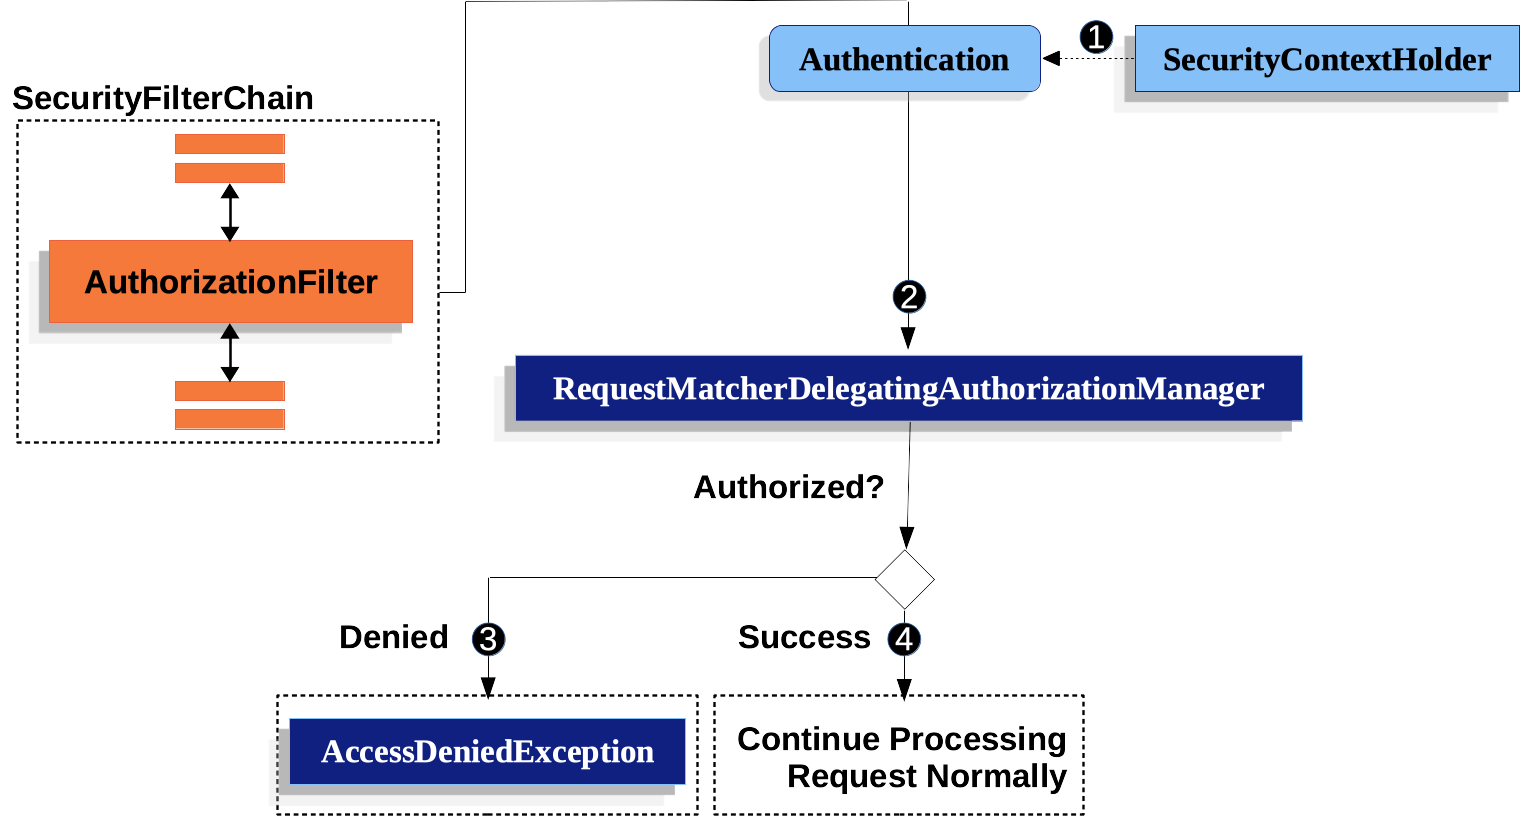
理解請求授權元件的工作原理
| 本節在Servlet 架構和實現的基礎上,深入探討了基於 Servlet 的應用程式中授權在請求級別的工作原理。 |
-
 首先,
首先,AuthorizationFilter構建一個Supplier,該Supplier從SecurityContextHolder檢索Authentication。 -
 其次,它將
其次,它將 Supplier<Authentication>和HttpServletRequest傳遞給AuthorizationManager。AuthorizationManager將請求與authorizeHttpRequests中的模式匹配,並執行相應的規則。-
 如果授權被拒絕,將釋出
 AuthorizationDeniedEvent,並丟擲AccessDeniedException。在這種情況下,ExceptionTranslationFilter處理AccessDeniedException。 -
 如果訪問被授予,將釋出
 AuthorizationGrantedEvent,並且AuthorizationFilter繼續執行FilterChain,從而允許應用程式正常處理。
-
AuthorizationFilter 預設位於末尾
AuthorizationFilter 預設位於Spring Security 過濾器鏈的末尾。這意味著 Spring Security 的身份驗證過濾器、漏洞防護和其他過濾器整合不需要授權。如果您在 AuthorizationFilter 之前新增自己的過濾器,它們也不需要授權;否則,它們將需要授權。
這通常在您新增 Spring MVC 端點時變得很重要。因為它們由 DispatcherServlet 執行,並且位於 AuthorizationFilter 之後,所以您的端點需要包含在 authorizeHttpRequests 中才能被允許。
所有分派都已授權
AuthorizationFilter 不僅在每個請求上執行,而且在每個分派上執行。這意味著 REQUEST 分派需要授權,FORWARD、ERROR 和 INCLUDE 也需要授權。
例如,Spring MVC 可以將請求 FORWARD 到一個檢視解析器,該解析器渲染一個 Thymeleaf 模板,如下所示:
-
Java
-
Kotlin
@Controller
public class MyController {
    @GetMapping("/endpoint")
    public String endpoint() {
        return "endpoint";
    }
}
@Controller
class MyController {
@GetMapping("/endpoint")
fun endpoint(): String {
return "endpoint"
}
}在這種情況下,授權發生兩次;一次是授權 /endpoint,另一次是轉發到 Thymeleaf 渲染“endpoint”模板。
因此,您可能希望允許所有 FORWARD 分派。
這個原則的另一個例子是 Spring Boot 如何處理錯誤。如果容器捕獲到一個異常,例如以下情況:
-
Java
-
Kotlin
@Controller
public class MyController {
    @GetMapping("/endpoint")
    public String endpoint() {
        throw new UnsupportedOperationException("unsupported");
    }
}
@Controller
class MyController {
@GetMapping("/endpoint")
fun endpoint(): String {
throw UnsupportedOperationException("unsupported")
}
}那麼 Boot 將其分派到 ERROR 分派。
在這種情況下,授權也發生兩次;一次是授權 /endpoint,另一次是分派錯誤。
因此,您可能希望允許所有 ERROR 分派。
Authentication 查詢被推遲
當請求始終被允許或始終被拒絕時,這與 authorizeHttpRequests 相關。在這些情況下,Authentication 不會被查詢,從而加快了請求速度。
授權端點
您可以配置 Spring Security,透過按優先順序順序新增更多規則來擁有不同的規則。
如果您希望 /endpoint 只能由具有 USER 許可權的終端使用者訪問,那麼您可以這樣做:
-
Java
-
Kotlin
-
Xml
@Bean
public SecurityFilterChain web(HttpSecurity http) throws Exception {
    http
        .authorizeHttpRequests((authorize) -> authorize
	    .requestMatchers("/endpoint").hasAuthority("USER")
            .anyRequest().authenticated()
        )
        // ...

    return http.build();
}
@Bean
fun web(http: HttpSecurity): SecurityFilterChain {
http {
authorizeHttpRequests {
authorize("/endpoint", hasAuthority("USER"))
authorize(anyRequest, authenticated)
}
}
return http.build()
}<http>
<intercept-url pattern="/endpoint" access="hasAuthority('USER')"/>
<intercept-url pattern="/**" access="authenticated"/>
</http>如您所見,宣告可以分解為模式/規則對。
AuthorizationFilter 按列出的順序處理這些對,只將第一個匹配項應用於請求。這意味著即使 /** 也將匹配 /endpoint,上述規則也不是問題。上述規則的解釋是:“如果請求是 /endpoint,則需要 USER 許可權;否則,只需進行身份驗證”。
Spring Security 支援多種模式和多種規則;您也可以以程式設計方式建立自己的模式和規則。
一旦獲得授權,您可以使用 Security 的測試支援,按以下方式進行測試:
-
Java
@WithMockUser(authorities="USER")
@Test
void endpointWhenUserAuthorityThenAuthorized() {
    this.mvc.perform(get("/endpoint"))
        .andExpect(status().isOk());
}

@WithMockUser
@Test
void endpointWhenNotUserAuthorityThenForbidden() {
    this.mvc.perform(get("/endpoint"))
        .andExpect(status().isForbidden());
}

@Test
void anyWhenUnauthenticatedThenUnauthorized() {
    this.mvc.perform(get("/any"))
        .andExpect(status().isUnauthorized());
}
匹配請求
上面您已經看到了兩種匹配請求的方式。
您看到的第一個是最簡單的,即匹配任何請求。
使用 Ant 匹配
Ant 是 Spring Security 用於匹配請求的預設語言。
您可以使用它來匹配單個端點或目錄,甚至可以捕獲佔位符以供以後使用。您還可以將其細化以匹配特定的 HTTP 方法集。
假設您不想匹配 /endpoint 端點,而是想匹配 /resource 目錄下的所有端點。在這種情況下,您可以執行以下操作:
-
Java
-
Kotlin
-
Xml
http
    .authorizeHttpRequests((authorize) -> authorize
        .requestMatchers("/resource/**").hasAuthority("USER")
        .anyRequest().authenticated()
    )
http {
authorizeHttpRequests {
authorize("/resource/**", hasAuthority("USER"))
authorize(anyRequest, authenticated)
}
}<http>
<intercept-url pattern="/resource/**" access="hasAuthority('USER')"/>
<intercept-url pattern="/**" access="authenticated"/>
</http>其解讀方式是:“如果請求是 /resource 或其某個子目錄,則需要 USER 許可權;否則,只需進行身份驗證”。
您還可以從請求中提取路徑值,如下所示:
-
Java
-
Kotlin
-
Xml
http
    .authorizeHttpRequests((authorize) -> authorize
        .requestMatchers("/resource/{name}").access(new WebExpressionAuthorizationManager("#name == authentication.name"))
        .anyRequest().authenticated()
    )
http {
authorizeHttpRequests {
authorize("/resource/{name}", WebExpressionAuthorizationManager("#name == authentication.name"))
authorize(anyRequest, authenticated)
}
}<http>
<intercept-url pattern="/resource/{name}" access="#name == authentication.name"/>
<intercept-url pattern="/**" access="authenticated"/>
</http>一旦獲得授權,您可以使用 Security 的測試支援,按以下方式進行測試:
-
Java
@WithMockUser(authorities="USER")
@Test
void endpointWhenUserAuthorityThenAuthorized() {
this.mvc.perform(get("/endpoint/jon"))
.andExpect(status().isOk());
}
@WithMockUser
@Test
void endpointWhenNotUserAuthorityThenForbidden() {
this.mvc.perform(get("/endpoint/jon"))
.andExpect(status().isForbidden());
}
@Test
void anyWhenUnauthenticatedThenUnauthorized() {
this.mvc.perform(get("/any"))
.andExpect(status().isUnauthorized());
}| Spring Security 只匹配路徑。如果您想匹配查詢引數,您將需要一個自定義請求匹配器。 |
使用正則表示式匹配
Spring Security 支援根據正則表示式匹配請求。如果您想應用比子目錄上的 ** 更嚴格的匹配條件,這會派上用場。
例如,考慮一個包含使用者名稱的路徑,以及所有使用者名稱必須是字母數字的規則。您可以使用 RegexRequestMatcher 來遵守此規則,如下所示:
-
Java
-
Kotlin
-
Xml
http
.authorizeHttpRequests((authorize) -> authorize
.requestMatchers(RegexRequestMatcher.regexMatcher("/resource/[A-Za-z0-9]+")).hasAuthority("USER")
.anyRequest().denyAll()
)http {
authorizeHttpRequests {
authorize(RegexRequestMatcher.regexMatcher("/resource/[A-Za-z0-9]+"), hasAuthority("USER"))
authorize(anyRequest, denyAll)
}
}<http>
<intercept-url request-matcher="regex" pattern="/resource/[A-Za-z0-9]+" access="hasAuthority('USER')"/>
<intercept-url pattern="/**" access="denyAll"/>
</http>按 HTTP 方法匹配
您還可以透過 HTTP 方法匹配規則。這在透過授予的許可權(例如授予 read 或 write 許可權)進行授權時非常方便。
要要求所有 GET 請求具有 read 許可權,所有 POST 請求具有 write 許可權,您可以這樣做:
-
Java
-
Kotlin
-
Xml
http
.authorizeHttpRequests((authorize) -> authorize
.requestMatchers(HttpMethod.GET).hasAuthority("read")
.requestMatchers(HttpMethod.POST).hasAuthority("write")
.anyRequest().denyAll()
)http {
authorizeHttpRequests {
authorize(HttpMethod.GET, hasAuthority("read"))
authorize(HttpMethod.POST, hasAuthority("write"))
authorize(anyRequest, denyAll)
}
}<http>
<intercept-url http-method="GET" pattern="/**" access="hasAuthority('read')"/>
<intercept-url http-method="POST" pattern="/**" access="hasAuthority('write')"/>
<intercept-url pattern="/**" access="denyAll"/>
</http>這些授權規則應解讀為:“如果請求是 GET,則需要 read 許可權;否則,如果請求是 POST,則需要 write 許可權;否則,拒絕請求”。
| 預設拒絕請求是一種健康的安全性做法,因為它將規則集轉換為允許列表。 |
一旦獲得授權,您可以使用 Security 的測試支援,按以下方式進行測試:
-
Java
@WithMockUser(authorities="read")
@Test
void getWhenReadAuthorityThenAuthorized() {
this.mvc.perform(get("/any"))
.andExpect(status().isOk());
}
@WithMockUser
@Test
void getWhenNoReadAuthorityThenForbidden() {
this.mvc.perform(get("/any"))
.andExpect(status().isForbidden());
}
@WithMockUser(authorities="write")
@Test
void postWhenWriteAuthorityThenAuthorized() {
this.mvc.perform(post("/any").with(csrf()))
.andExpect(status().isOk());
}
@WithMockUser(authorities="read")
@Test
void postWhenNoWriteAuthorityThenForbidden() {
this.mvc.perform(get("/any").with(csrf()))
.andExpect(status().isForbidden());
}按排程器型別匹配
| 此功能目前不支援 XML |
如前所述,Spring Security 預設授權所有排程器型別。儘管在 REQUEST 排程上建立的安全上下文會延續到後續排程,但細微的不匹配有時會導致意外的 AccessDeniedException。
為了解決這個問題,您可以配置 Spring Security Java 配置以允許 FORWARD 和 ERROR 等排程器型別,如下所示:
-
Java
-
Kotlin
http
.authorizeHttpRequests((authorize) -> authorize
.dispatcherTypeMatchers(DispatcherType.FORWARD, DispatcherType.ERROR).permitAll()
.requestMatchers("/endpoint").permitAll()
.anyRequest().denyAll()
)http {
authorizeHttpRequests {
authorize(DispatcherTypeRequestMatcher(DispatcherType.FORWARD), permitAll)
authorize(DispatcherTypeRequestMatcher(DispatcherType.ERROR), permitAll)
authorize("/endpoint", permitAll)
authorize(anyRequest, denyAll)
}
}按 Servlet 路徑匹配
一般而言,您可以使用 requestMatchers(String),如上所示。
但是,如果您有來自多個 servlet 的授權規則,則需要指定這些規則:
-
Java
-
Kotlin
-
Xml
import static org.springframework.security.web.servlet.util.matcher.PathPatternRequestMatcher.withDefaults;
@Bean
SecurityFilterChain appEndpoints(HttpSecurity http) {
PathPatternRequestMatcher.Builder mvc = withDefaults().basePath("/spring-mvc");
http
.authorizeHttpRequests((authorize) -> authorize
.requestMatchers(mvc.matcher("/admin/**")).hasAuthority("admin")
.requestMatchers(mvc.matcher("/my/controller/**")).hasAuthority("controller")
.anyRequest().authenticated()
);
return http.build();
}@Bean
fun appEndpoints(http: HttpSecurity): SecurityFilterChain {
http {
authorizeHttpRequests {
authorize("/spring-mvc", "/admin/**", hasAuthority("admin"))
authorize("/spring-mvc", "/my/controller/**", hasAuthority("controller"))
authorize(anyRequest, authenticated)
}
}
}<http>
<intercept-url servlet-path="/spring-mvc" pattern="/admin/**" access="hasAuthority('admin')"/>
<intercept-url servlet-path="/spring-mvc" pattern="/my/controller/**" access="hasAuthority('controller')"/>
<intercept-url pattern="/**" access="authenticated"/>
</http>這是因為 Spring Security 要求所有 URI 都是絕對的(減去上下文路徑)。
|
還有其他幾個元件為您建立請求匹配器,例如 |
使用自定義匹配器
| 此功能目前不支援 XML |
在 Java 配置中,您可以建立自己的 RequestMatcher 並將其提供給 DSL,如下所示:
-
Java
-
Kotlin
RequestMatcher printview = (request) -> request.getParameter("print") != null;
http
.authorizeHttpRequests((authorize) -> authorize
.requestMatchers(printview).hasAuthority("print")
.anyRequest().authenticated()
)val printview: RequestMatcher = { (request) -> request.getParameter("print") != null }
http {
authorizeHttpRequests {
authorize(printview, hasAuthority("print"))
authorize(anyRequest, authenticated)
}
}由於 RequestMatcher 是一個函式式介面,您可以將其作為 lambda 表示式提供給 DSL。但是,如果您想從請求中提取值,則需要一個具體類,因為這需要重寫一個 default 方法。 |
一旦獲得授權,您可以使用 Security 的測試支援,按以下方式進行測試:
-
Java
@WithMockUser(authorities="print")
@Test
void printWhenPrintAuthorityThenAuthorized() {
this.mvc.perform(get("/any?print"))
.andExpect(status().isOk());
}
@WithMockUser
@Test
void printWhenNoPrintAuthorityThenForbidden() {
this.mvc.perform(get("/any?print"))
.andExpect(status().isForbidden());
}授權請求
一旦請求匹配,您可以透過已經看到的幾種方式授權它,例如 permitAll、denyAll 和 hasAuthority。
快速總結一下,以下是 DSL 中內建的授權規則:
-
permitAll- 請求不需要授權,是一個公共端點;請注意,在這種情況下,Authentication永遠不會從會話中檢索。 -
denyAll- 在任何情況下都不允許請求;請注意,在這種情況下,Authentication永遠不會從會話中檢索。 -
hasAuthority- 請求要求Authentication具有與給定值匹配的GrantedAuthority。 -
hasRole-hasAuthority的快捷方式,其字首為ROLE_或配置為預設字首的任何內容。 -
hasAnyAuthority- 請求要求Authentication具有與給定值中任何一個匹配的GrantedAuthority。 -
hasAnyRole-hasAnyAuthority的快捷方式,其字首為ROLE_或配置為預設字首的任何內容*hasAnyAuthority- 請求要求Authentication具有與給定值中任何一個匹配的GrantedAuthority。 -
hasAllRoles-hasAllAuthorities的快捷方式,其字首為ROLE_或配置為預設字首的任何內容。 -
hasAllAuthorities- 請求要求Authentication具有與所有給定值匹配的GrantedAuthority。 -
access- 請求使用此自定義AuthorizationManager來確定訪問許可權。
現在您已經瞭解了模式、規則以及它們如何組合在一起,您應該能夠理解這個更復雜的示例中發生的事情:
-
Java
import static jakarta.servlet.DispatcherType.*;
import static org.springframework.security.authorization.AuthorizationManagers.allOf;
import static org.springframework.security.authorization.AuthorityAuthorizationManager.hasAuthority;
import static org.springframework.security.authorization.AuthorityAuthorizationManager.hasRole;
@Bean
SecurityFilterChain web(HttpSecurity http) throws Exception {
http
// ...
.authorizeHttpRequests((authorize) -> authorize (1)
.dispatcherTypeMatchers(FORWARD, ERROR).permitAll() (2)
.requestMatchers("/static/**", "/signup", "/about").permitAll() (3)
.requestMatchers("/admin/**").hasRole("ADMIN") (4)
.requestMatchers("/db/**").hasAllAuthorities("db", "ROLE_ADMIN") (5)
.anyRequest().denyAll() (6)
);
return http.build();
}| 1 | 指定了多個授權規則。每個規則按宣告的順序考慮。 |
| 2 | 允許 FORWARD 和 ERROR 分派,以允許 Spring MVC 渲染檢視和 Spring Boot 渲染錯誤。 |
| 3 | 我們指定了多個任何使用者都可以訪問的 URL 模式。具體來說,如果 URL 以“/static/”開頭、等於“/signup”或等於“/about”,則任何使用者都可以訪問該請求。 |
| 4 | 任何以“/admin/”開頭的 URL 都將限制為具有“ROLE_ADMIN”角色的使用者。您會注意到,由於我們呼叫的是 hasRole 方法,因此無需指定“ROLE_”字首。 |
| 5 | 任何以“/db/”開頭的 URL 都要求使用者同時被授予“db”許可權並具有“ROLE_ADMIN”角色。您會注意到,由於我們使用 hasAllAuthorities 表示式,因此必須指定“ROLE_”字首。 |
| 6 | 任何尚未匹配的 URL 都將被拒絕訪問。如果您不想意外地忘記更新授權規則,這是一個很好的策略。 |
自定義授權管理器
當您使用 authorizeHttpRequests DSL 時,Spring Security 會為您建立適當的 AuthorizationManager 例項。在某些情況下,您可能希望自定義建立內容,以完全控制框架級別的授權決策。
為了控制建立用於授權 HTTP 請求的 AuthorizationManager 例項,您可以建立自定義的 AuthorizationManagerFactory。例如,假設您想建立一個約定,即經過身份驗證的使用者必須經過身份驗證 *AND* 擁有 USER 角色。為此,您可以為 HTTP 請求建立一個自定義實現,如以下示例所示:
-
Java
-
Kotlin
@Component
public class CustomHttpRequestsAuthorizationManagerFactory
implements AuthorizationManagerFactory<RequestAuthorizationContext> {
private final AuthorizationManagerFactory<RequestAuthorizationContext> delegate =
new DefaultAuthorizationManagerFactory<>();
@Override
public AuthorizationManager<RequestAuthorizationContext> authenticated() {
return AuthorizationManagers.allOf(
this.delegate.authenticated(),
this.delegate.hasRole("USER")
);
}
}@Component
class CustomHttpRequestsAuthorizationManagerFactory : AuthorizationManagerFactory<RequestAuthorizationContext> {
private val delegate = DefaultAuthorizationManagerFactory<RequestAuthorizationContext>()
override fun authenticated(): AuthorizationManager<RequestAuthorizationContext> {
return AuthorizationManagers.allOf(
delegate.authenticated(),
delegate.hasRole("USER")
)
}
}現在,無論何時您需要身份驗證,Spring Security 都會自動呼叫您的自定義工廠來建立需要身份驗證 *AND* USER 角色的 AuthorizationManager 例項。
我們將其用作建立自定義 AuthorizationManagerFactory 的簡單示例,但也可以(而且通常更簡單)僅為特定請求替換特定的 AuthorizationManager。有關示例,請參閱使用授權資料庫、策略代理或其他服務。 |
使用 SpEL 表達授權
雖然建議使用具體的 AuthorizationManager,但在某些情況下,表示式是必需的,例如在 <intercept-url> 或 JSP Taglibs 中。因此,本節將重點關注這些領域的示例。
鑑於此,讓我們更深入地瞭解 Spring Security 的 Web Security Authorization SpEL API。
Spring Security 將其所有授權欄位和方法封裝在一組根物件中。最通用的根物件稱為 SecurityExpressionRoot,它構成了 WebSecurityExpressionRoot 的基礎。Spring Security 在準備評估授權表示式時將此根物件提供給 StandardEvaluationContext。
使用授權表示式欄位和方法
這提供的第一件事是為您的 SpEL 表示式提供一組增強的授權欄位和方法。以下是最常用方法的快速概述:
-
permitAll- 請求不需要授權即可呼叫;請注意,在這種情況下,Authentication永遠不會從會話中檢索。 -
denyAll- 在任何情況下都不允許請求;請注意,在這種情況下,Authentication永遠不會從會話中檢索。 -
hasAuthority- 請求要求Authentication具有與給定值匹配的GrantedAuthority。 -
hasRole-hasAuthority的快捷方式,其字首為ROLE_或配置為預設字首的任何內容。 -
hasAnyAuthority- 請求要求Authentication具有與給定值中任何一個匹配的GrantedAuthority。 -
hasAnyRole-hasAnyAuthority的快捷方式,其字首為ROLE_或配置為預設字首的任何內容。 -
hasPermission- 用於執行物件級別授權的PermissionEvaluator例項的鉤子。
以下是最常用欄位的簡要概述:
-
authentication- 與此方法呼叫關聯的Authentication例項。 -
principal- 與此方法呼叫關聯的Authentication#getPrincipal。
現在您已經瞭解了模式、規則以及它們如何組合在一起,您應該能夠理解這個更復雜的示例中發生的事情:
-
Xml
<http>
<intercept-url pattern="/static/**" access="permitAll"/> (1)
<intercept-url pattern="/admin/**" access="hasRole('ADMIN')"/> (2)
<intercept-url pattern="/db/**" access="hasAuthority('db') and hasRole('ADMIN')"/> (3)
<intercept-url pattern="/**" access="denyAll"/> (4)
</http>| 1 | 我們指定了一個任何使用者都可以訪問的 URL 模式。具體來說,如果 URL 以“/static/”開頭,則任何使用者都可以訪問該請求。 |
| 2 | 任何以“/admin/”開頭的 URL 都將限制為具有“ROLE_ADMIN”角色的使用者。您會注意到,由於我們呼叫的是 hasRole 方法,因此無需指定“ROLE_”字首。 |
| 3 | 任何以“/db/”開頭的 URL 都要求使用者同時被授予“db”許可權並具有“ROLE_ADMIN”角色。您會注意到,由於我們使用 hasRole 表示式,因此無需指定“ROLE_”字首。 |
| 4 | 任何尚未匹配的 URL 都將被拒絕訪問。如果您不想意外地忘記更新授權規則,這是一個很好的策略。 |
使用路徑引數
此外,Spring Security 提供了一種發現路徑引數的機制,因此它們也可以在 SpEL 表示式中訪問。
例如,您可以透過以下方式在 SpEL 表示式中訪問路徑引數:
-
Xml
<http>
    <intercept-url pattern="/resource/{name}" access="#name == authentication.name"/>
    <intercept-url pattern="/**" access="authenticated"/>
</http>此表示式指的是 /resource/ 後的路徑變數,並要求它等於 Authentication#getName。
使用授權資料庫、策略代理或其他服務
如果您想配置 Spring Security 以使用單獨的服務進行授權,您可以建立自己的 AuthorizationManager 並將其與 anyRequest 匹配。
首先,您的 AuthorizationManager 可能看起來像這樣:
-
Java
@Component
public final class OpenPolicyAgentAuthorizationManager implements AuthorizationManager<RequestAuthorizationContext> {
    @Override
    public AuthorizationResult authorize(Supplier<Authentication> authentication, RequestAuthorizationContext context) {
        // make request to Open Policy Agent
    }
}
然後,您可以透過以下方式將其連線到 Spring Security:
-
Java
@Bean
SecurityFilterChain web(HttpSecurity http, AuthorizationManager<RequestAuthorizationContext> authz) throws Exception {
	http
		// ...
		.authorizeHttpRequests((authorize) -> authorize
            .anyRequest().access(authz)
		);

	return http.build();
}
推薦 permitAll 而非 ignoring
當您擁有靜態資源時,配置過濾器鏈忽略這些值可能很誘人。更安全的方法是使用 permitAll 允許它們,如下所示:
-
Java
-
Kotlin
http
    .authorizeHttpRequests((authorize) -> authorize
        .requestMatchers("/css/**").permitAll()
        .anyRequest().authenticated()
    )
http {
authorizeHttpRequests {
authorize("/css/**", permitAll)
authorize(anyRequest, authenticated)
}
}它更安全,因為即使是靜態資源,編寫安全頭部也很重要,如果請求被忽略,Spring Security 就無法做到這一點。
過去,這會帶來效能上的權衡,因為 Spring Security 在每個請求上都會查詢會話。然而,從 Spring Security 6 開始,除非授權規則需要,否則不再對會話進行 ping 操作。由於效能影響現已解決,Spring Security 建議對所有請求至少使用 permitAll。
從 authorizeRequests 遷移
AuthorizationFilter 取代了 FilterSecurityInterceptor。為了保持向後相容,FilterSecurityInterceptor 仍然是預設值。本節討論 AuthorizationFilter 的工作原理以及如何覆蓋預設配置。 |
AuthorizationFilter 為 HttpServletRequest 提供授權。它作為安全過濾器之一插入到FilterChainProxy中。
當您宣告 SecurityFilterChain 時,您可以覆蓋預設設定。不再使用 authorizeRequests,而是使用 authorizeHttpRequests,如下所示:
-
Java
@Bean
SecurityFilterChain web(HttpSecurity http) throws AuthenticationException {
    http
        .authorizeHttpRequests((authorize) -> authorize
            .anyRequest().authenticated();
        )
        // ...

    return http.build();
}
這在許多方面改進了 authorizeRequests:
-
使用簡化的
AuthorizationManagerAPI,而不是元資料來源、配置屬性、決策管理器和投票器。這簡化了重用和定製。 -
延遲
Authentication查詢。不再需要為每個請求查詢身份驗證,它只會查詢那些需要身份驗證才能做出授權決策的請求。 -
基於 Bean 的配置支援。
當使用 authorizeHttpRequests 而不是 authorizeRequests 時,將使用 AuthorizationFilter 而不是 FilterSecurityInterceptor。
遷移表示式
在可能的情況下,建議您使用型別安全的授權管理器而不是 SpEL。對於 Java 配置,WebExpressionAuthorizationManager 可用於幫助遷移舊版 SpEL。
要使用 WebExpressionAuthorizationManager,您可以使用您要遷移的表示式構建一個,如下所示:
-
Java
-
Kotlin
.requestMatchers("/test/**").access(new WebExpressionAuthorizationManager("hasRole('ADMIN') && hasRole('USER')")).requestMatchers("/test/**").access(WebExpressionAuthorizationManager("hasRole('ADMIN') && hasRole('USER')"))要遷移多個,您可以使用 WebExpressionAuthorizationManager#withDefaults
-
Java
-
Kotlin
WebExpressionAuthorizationManager.Builder authz = WebExpressionAuthorizationManager.withDefaults();
.requestMatchers("/test/**").access(authz.expression("hasRole('ADMIN') && hasRole('USER')"))
.requestMatchers("/test/**").access(authz.expression("permitAll"))
var authz = WebExpressionAuthorizationManager.withDefaults()
.requestMatchers("/test/**").access(authz.expression("hasRole('ADMIN') && hasRole('USER')"))
.requestMatchers("/test/**").access(authz.expression("permitAll"))如果您在表示式中引用 bean,例如:@webSecurity.check(authentication, request),建議您直接呼叫 bean,這將類似於以下內容:
-
Java
-
Kotlin
.requestMatchers("/test/**").access((authentication, context) ->
    new AuthorizationDecision(webSecurity.check(authentication.get(), context.getRequest())))
.requestMatchers("/test/**").access((authentication, context): AuthorizationManager<RequestAuthorizationContext> ->
AuthorizationDecision(webSecurity.check(authentication.get(), context.getRequest())))對於包含 Bean 引用以及其他表示式的複雜指令,建議您將它們更改為實現 AuthorizationManager,並透過呼叫 .access(AuthorizationManager) 來引用它們。
如果無法做到這一點,您可以將 WebExpressionAuthorizationManager.Builder 釋出為 bean:
-
Java
-
Kotlin
@Bean
WebExpressionAuthorizationManager.Builder authz() {
	return WebExpressionAuthorizationManager.withDefaults();
}
@Bean
fun authz(): WebExpressionAuthorizationManager.Builder {
return WebExpressionAuthorizationManager.withDefaults()
}然後,傳遞給該構建器的表示式將能夠引用 bean。
安全匹配器
RequestMatcher 介面用於確定請求是否匹配給定的規則。我們使用 securityMatchers 來確定給定的 HttpSecurity 是否應該應用於給定的請求。同樣,我們可以使用 requestMatchers 來確定我們應該應用於給定請求的授權規則。請看以下示例:
-
Java
-
Kotlin
@Configuration
@EnableWebSecurity
public class SecurityConfig {

	@Bean
	public SecurityFilterChain securityFilterChain(HttpSecurity http) throws Exception {
		http
			.securityMatcher("/api/**")                            (1)
			.authorizeHttpRequests((authorize) -> authorize
				.requestMatchers("/api/user/**").hasRole("USER")   (2)
				.requestMatchers("/api/admin/**").hasRole("ADMIN") (3)
				.anyRequest().authenticated()                      (4)
			)
			.formLogin(withDefaults());
		return http.build();
	}
}
@Configuration
@EnableWebSecurity
open class SecurityConfig {
@Bean
open fun web(http: HttpSecurity): SecurityFilterChain {
http {
securityMatcher("/api/**") (1)
authorizeHttpRequests {
authorize("/api/user/**", hasRole("USER")) (2)
authorize("/api/admin/**", hasRole("ADMIN")) (3)
authorize(anyRequest, authenticated) (4)
}
}
return http.build()
}
}| 1 | 配置 HttpSecurity 僅應用於以 /api/ 開頭的 URL。 |
| 2 | 允許具有 USER 角色的使用者訪問以 /api/user/ 開頭的 URL。 |
| 3 | 允許具有 ADMIN 角色的使用者訪問以 /api/admin/ 開頭的 URL。 |
| 4 | 任何不符合上述規則的其他請求都將需要身份驗證。 |
如果可用,securityMatcher(s) 和 requestMatcher(s) 方法將使用 PathPatternRequestMatcher.Builder Bean 構造 RequestMatcher。您可以在此處閱讀有關 Spring MVC 整合的更多資訊。
如果您想使用特定的 RequestMatcher,只需將實現傳遞給 securityMatcher 和/或 requestMatcher 方法:
-
Java
-
Kotlin
import static org.springframework.security.web.servlet.util.matcher.PathPatternRequestMatcher.withDefaults; (1)
import static org.springframework.security.web.util.matcher.RegexRequestMatcher.regexMatcher;

@Configuration
@EnableWebSecurity
public class SecurityConfig {

	@Bean
	public SecurityFilterChain securityFilterChain(HttpSecurity http) throws Exception {
		http
			.securityMatcher(antMatcher("/api/**"))                              (2)
			.authorizeHttpRequests((authorize) -> authorize
				.requestMatchers(withDefaults().matcher("/api/user/**")).hasRole("USER")     (3)
				.requestMatchers(regexMatcher("/api/admin/.*")).hasRole("ADMIN") (4)
				.requestMatchers(new MyCustomRequestMatcher()).hasRole("SUPERVISOR")     (5)
				.anyRequest().authenticated()
			)
			.formLogin(withDefaults());
		return http.build();
	}
}

public class MyCustomRequestMatcher implements RequestMatcher {

    @Override
    public boolean matches(HttpServletRequest request) {
        // ...
    }
}
import org.springframework.security.web.servlet.util.matcher.PathPatternRequestMatcher.withDefaults (1)
import org.springframework.security.web.util.matcher.RegexRequestMatcher.regexMatcher
@Configuration
@EnableWebSecurity
open class SecurityConfig {
@Bean
open fun web(http: HttpSecurity): SecurityFilterChain {
http {
securityMatcher(antMatcher("/api/**")) (2)
authorizeHttpRequests {
authorize(withDefaults().matcher("/api/user/**"), hasRole("USER")) (3)
authorize(regexMatcher("/api/admin/**"), hasRole("ADMIN")) (4)
authorize(MyCustomRequestMatcher(), hasRole("SUPERVISOR")) (5)
authorize(anyRequest, authenticated)
}
}
return http.build()
}
}| 1 | 從 PathPatternRequestMatcher 和 RegexRequestMatcher 匯入靜態工廠方法以建立 RequestMatcher 例項。 |
| 2 | 使用 PathPatternRequestMatcher 配置 HttpSecurity 僅應用於以 /api/ 開頭的 URL。 |
| 3 | 使用 PathPatternRequestMatcher 允許具有 USER 角色的使用者訪問以 /api/user/ 開頭的 URL。 |
| 4 | 使用 RegexRequestMatcher 允許具有 ADMIN 角色的使用者訪問以 /api/admin/ 開頭的 URL。 |
| 5 | 使用自定義 RequestMatcher 允許具有 SUPERVISOR 角色的使用者訪問匹配 MyCustomRequestMatcher 的 URL。 |

