子元素
當此 Gateway 從 PollableChannel 接收訊息時,您必須提供一個全域性預設 Poller 或向 Job Launching Gateway 提供一個 Poller 子元素。
-
Java
-
XML
以下示例展示瞭如何在 Java 中提供 Poller
@Bean
@ServiceActivator(inputChannel = "queueChannel", poller = @Poller(fixedRate="1000"))
public JobLaunchingGateway sampleJobLaunchingGateway() {
    JobLaunchingGateway jobLaunchingGateway = new JobLaunchingGateway(jobLauncher());
    jobLaunchingGateway.setOutputChannel(replyChannel());
    return jobLaunchingGateway;
}
以下示例展示瞭如何在 XML 中提供 Poller
<batch-int:job-launching-gateway request-channel="queueChannel"
    reply-channel="replyChannel" job-launcher="jobLauncher">
  <int:poller fixed-rate="1000">
</batch-int:job-launching-gateway>
提供資訊性訊息的反饋
由於 Spring Batch job 可能執行很長時間,提供進度資訊通常至關重要。例如,利益相關者可能希望在批處理 job 的部分或全部失敗時收到通知。Spring Batch 透過以下方式支援收集此資訊:
-
主動輪詢
-
事件驅動的監聽器
當非同步啟動 Spring Batch job 時(例如,透過使用 Job Launching Gateway),會返回一個 JobExecution 例項。因此,您可以使用 JobExecution.getJobId() 透過使用 JobExplorer 從 JobRepository 中檢索更新的 JobExecution 例項來持續輪詢狀態更新。但是,這被認為是次優的,推薦使用事件驅動的方法。
因此,Spring Batch 提供了監聽器,包括三種最常用的監聽器:
-
StepListener -
ChunkListener -
JobExecutionListener
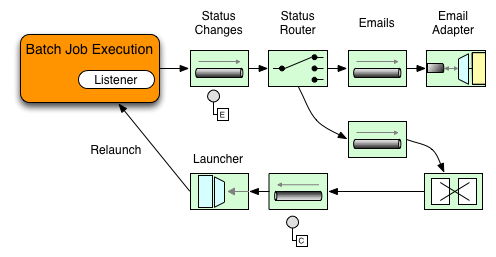
在下圖所示的示例中,Spring Batch job 已配置了 StepExecutionListener。因此,Spring Integration 接收並處理任何 Step 執行前或執行後事件。例如,您可以使用 Router 檢查收到的 StepExecution。根據檢查結果,可以發生各種事情(例如,將訊息路由到郵件出站通道介面卡),以便可以根據某些條件傳送電子郵件通知。
以下兩部分示例展示瞭如何配置監聽器以便將訊息傳送到用於 StepExecution 事件的 Gateway 並將其輸出記錄到 logging-channel-adapter。
首先,建立通知整合 bean。
-
Java
-
XML
以下示例展示瞭如何在 Java 中建立通知整合 bean
@Bean
@ServiceActivator(inputChannel = "stepExecutionsChannel")
public LoggingHandler loggingHandler() {
    LoggingHandler adapter = new LoggingHandler(LoggingHandler.Level.WARN);
    adapter.setLoggerName("TEST_LOGGER");
    adapter.setLogExpressionString("headers.id + ': ' + payload");
    return adapter;
}

@MessagingGateway(name = "notificationExecutionsListener", defaultRequestChannel = "stepExecutionsChannel")
public interface NotificationExecutionListener extends StepExecutionListener {}
您需要在配置中新增 @IntegrationComponentScan 註解。 |
以下示例展示瞭如何在 XML 中建立通知整合 bean
<int:channel id="stepExecutionsChannel"/>

<int:gateway id="notificationExecutionsListener"
    service-interface="org.springframework.batch.core.StepExecutionListener"
    default-request-channel="stepExecutionsChannel"/>

<int:logging-channel-adapter channel="stepExecutionsChannel"/>
其次,修改您的 job 以新增 Step 級別的監聽器。
-
Java
-
XML
以下示例展示瞭如何在 Java 中新增 Step 級別的監聽器
public Job importPaymentsJob(JobRepository jobRepository, PlatformTransactionManager transactionManager) {
    return new JobBuilder("importPayments", jobRepository)
        .start(new StepBuilder("step1", jobRepository)
                .chunk(200, transactionManager)
                .listener(notificationExecutionsListener())
                // ...
                .build();
              )
        .build();
}
以下示例展示瞭如何在 XML 中新增 Step 級別的監聽器
<job id="importPayments">
    <step id="step1">
        <tasklet ../>
            <chunk ../>
            <listeners>
                <listener ref="notificationExecutionsListener"/>
            </listeners>
        </tasklet>
        ...
    </step>
</job>
非同步處理器
非同步處理器可幫助您擴充套件 Item 的處理能力。在非同步處理器用例中,一個 AsyncItemProcessor 充當排程器,在新執行緒上執行 Item 的 ItemProcessor 邏輯。Item 完成後,將 Future 傳遞給 AsyncItemWriter 進行寫入。
因此,您可以透過使用非同步 Item 處理來提高效能,這基本上使您可以實現分叉-合併(fork-join)場景。一旦所有結果可用,AsyncItemWriter 就會收集結果並寫回 Chunk。
-
Java
-
XML
以下示例展示瞭如何在 Java 中配置 AsyncItemProcessor
@Bean
public AsyncItemProcessor processor(ItemProcessor itemProcessor, TaskExecutor taskExecutor) {
    AsyncItemProcessor asyncItemProcessor = new AsyncItemProcessor();
    asyncItemProcessor.setTaskExecutor(taskExecutor);
    asyncItemProcessor.setDelegate(itemProcessor);
    return asyncItemProcessor;
}
以下示例展示瞭如何在 XML 中配置 AsyncItemProcessor
<bean id="processor"
    class="org.springframework.batch.integration.async.AsyncItemProcessor">
  <property name="delegate">
    <bean class="your.ItemProcessor"/>
  </property>
  <property name="taskExecutor">
    <bean class="org.springframework.core.task.SimpleAsyncTaskExecutor"/>
  </property>
</bean>
delegate 屬性引用您的 ItemProcessor bean,而 taskExecutor 屬性引用您選擇的 TaskExecutor。
-
Java
-
XML
以下示例展示瞭如何在 Java 中配置 AsyncItemWriter
@Bean
public AsyncItemWriter writer(ItemWriter itemWriter) {
    AsyncItemWriter asyncItemWriter = new AsyncItemWriter();
    asyncItemWriter.setDelegate(itemWriter);
    return asyncItemWriter;
}
以下示例展示瞭如何在 XML 中配置 AsyncItemWriter
<bean id="itemWriter"
    class="org.springframework.batch.integration.async.AsyncItemWriter">
  <property name="delegate">
    <bean id="itemWriter" class="your.ItemWriter"/>
  </property>
</bean>同樣,delegate 屬性實際上是您的 ItemWriter bean 的引用。
外部化批處理執行
到目前為止討論的整合方法提出了 Spring Integration 像外殼一樣包裹 Spring Batch 的用例。然而,Spring Batch 也可以在內部使用 Spring Integration。透過這種方法,Spring Batch 使用者可以將 Item 甚至 Chunk 的處理委託給外部程序。這使您可以分載複雜的處理。Spring Batch Integration 為以下方面提供了專門的支援:
-
遠端 Chunking
-
遠端 Partitioning
遠端 Chunking
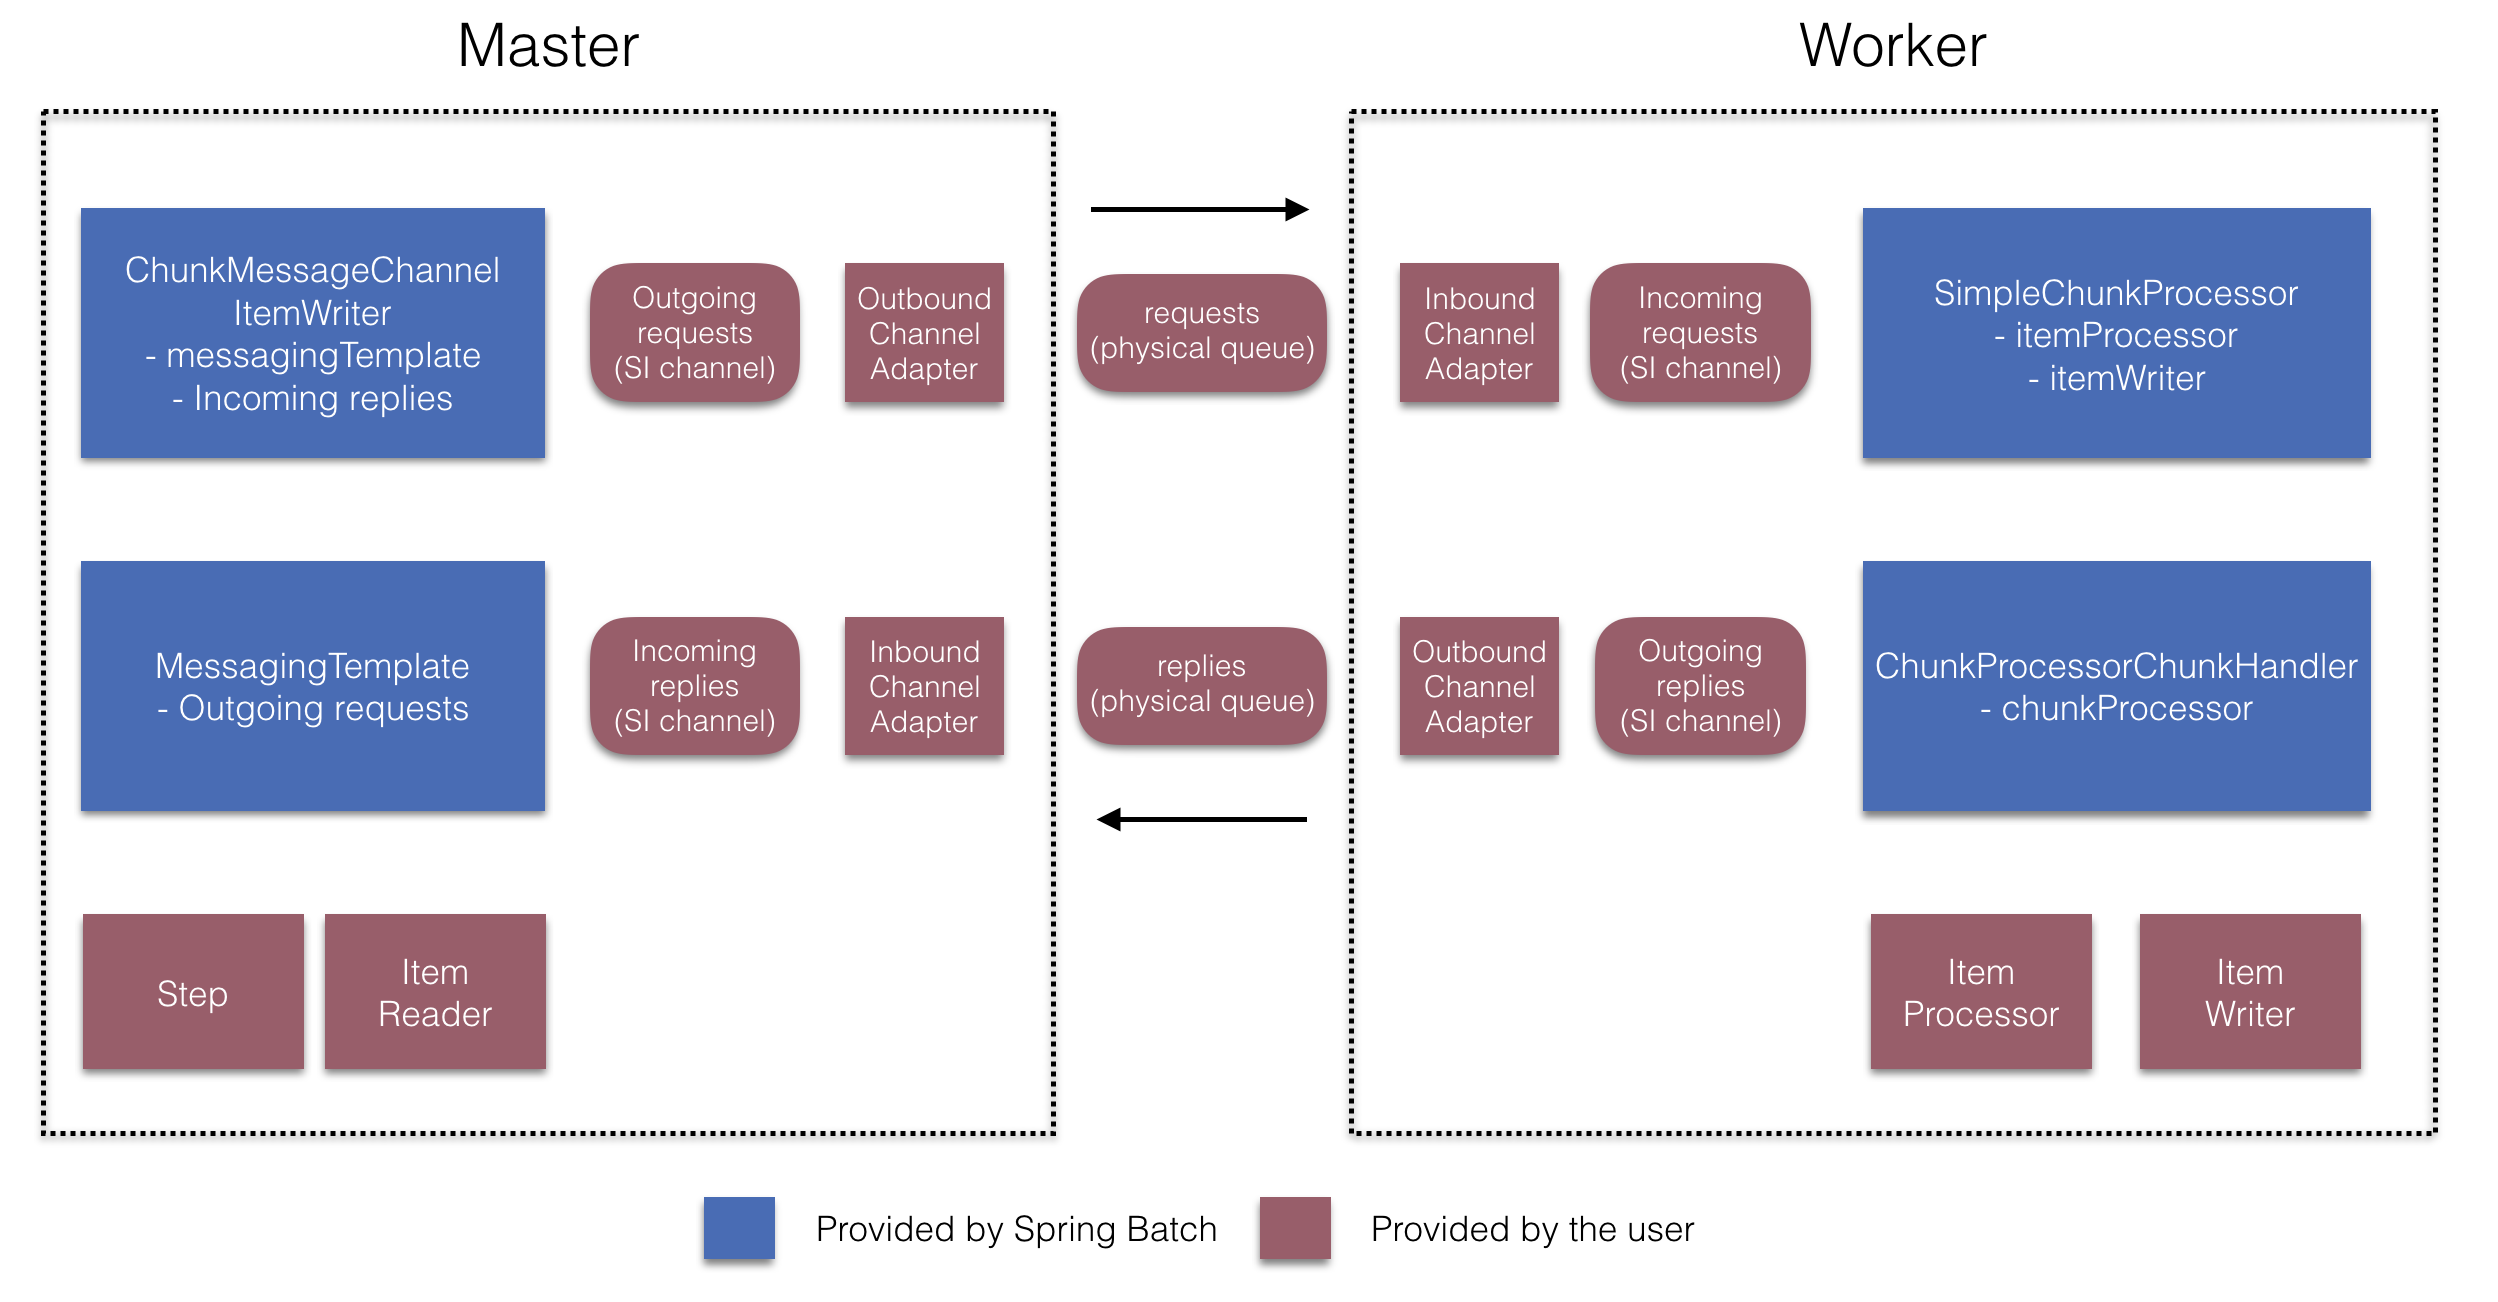
下圖展示了將 Spring Batch 與 Spring Integration 一起使用時,遠端 Chunking 工作的一種方式
更進一步,您還可以透過使用 ChunkMessageChannelItemWriter(由 Spring Batch Integration 提供)來外部化 Chunk 處理,它傳送 Item 並收集結果。一旦傳送,Spring Batch 會繼續讀取和分組 Item 的過程,而無需等待結果。相反,ChunkMessageChannelItemWriter 的責任是收集結果並將其整合回 Spring Batch 程序中。
使用 Spring Integration,您可以完全控制程序的併發性(例如,透過使用 QueueChannel 而不是 DirectChannel)。此外,透過依賴 Spring Integration 豐富的通道介面卡集合(如 JMS 和 AMQP),您可以將批處理 Job 的 Chunk 分發到外部系統進行處理。
-
Java
-
XML
包含需要遠端 Chunking 的 Step 的 Job 在 Java 中的配置可能與以下類似
public Job chunkJob(JobRepository jobRepository, PlatformTransactionManager transactionManager) {
     return new JobBuilder("personJob", jobRepository)
             .start(new StepBuilder("step1", jobRepository)
                     .<Person, Person>chunk(200, transactionManager)
                     .reader(itemReader())
                     .writer(itemWriter())
                     .build())
             .build();
 }
包含需要遠端 Chunking 的 Step 的 Job 在 XML 中的配置可能與以下類似
<job id="personJob">
  <step id="step1">
    <tasklet>
      <chunk reader="itemReader" writer="itemWriter" commit-interval="200"/>
    </tasklet>
    ...
  </step>
</job>
ItemReader 引用指向您希望在管理器上用於讀取資料的 bean。ItemWriter 引用指向一個特殊的 ItemWriter(稱為 ChunkMessageChannelItemWriter),如前所述。處理器(如果有)被排除在管理器配置之外,因為它在 worker 上配置。在實現您的用例時,您應檢查任何其他元件屬性,例如節流限制等。
-
Java
-
XML
以下 Java 配置提供了基本的管理器設定
@Bean
public org.apache.activemq.ActiveMQConnectionFactory connectionFactory() {
    ActiveMQConnectionFactory factory = new ActiveMQConnectionFactory();
    factory.setBrokerURL("tcp://:61616");
    return factory;
}

/*
 * Configure outbound flow (requests going to workers)
 */
@Bean
public DirectChannel requests() {
    return new DirectChannel();
}

@Bean
public IntegrationFlow outboundFlow(ActiveMQConnectionFactory connectionFactory) {
    return IntegrationFlow
            .from(requests())
            .handle(Jms.outboundAdapter(connectionFactory).destination("requests"))
            .get();
}

/*
 * Configure inbound flow (replies coming from workers)
 */
@Bean
public QueueChannel replies() {
    return new QueueChannel();
}

@Bean
public IntegrationFlow inboundFlow(ActiveMQConnectionFactory connectionFactory) {
    return IntegrationFlow
            .from(Jms.messageDrivenChannelAdapter(connectionFactory).destination("replies"))
            .channel(replies())
            .get();
}

/*
 * Configure the ChunkMessageChannelItemWriter
 */
@Bean
public ItemWriter<Integer> itemWriter() {
    MessagingTemplate messagingTemplate = new MessagingTemplate();
    messagingTemplate.setDefaultChannel(requests());
    messagingTemplate.setReceiveTimeout(2000);
    ChunkMessageChannelItemWriter<Integer> chunkMessageChannelItemWriter
            = new ChunkMessageChannelItemWriter<>();
    chunkMessageChannelItemWriter.setMessagingOperations(messagingTemplate);
    chunkMessageChannelItemWriter.setReplyChannel(replies());
    return chunkMessageChannelItemWriter;
}
以下 XML 配置提供了基本的管理器設定
<bean id="connectionFactory" class="org.apache.activemq.ActiveMQConnectionFactory">
  <property name="brokerURL" value="tcp://:61616"/>
</bean>

<int-jms:outbound-channel-adapter id="jmsRequests" destination-name="requests"/>

<bean id="messagingTemplate"
    class="org.springframework.integration.core.MessagingTemplate">
  <property name="defaultChannel" ref="requests"/>
  <property name="receiveTimeout" value="2000"/>
</bean>

<bean id="itemWriter"
    class="org.springframework.batch.integration.chunk.ChunkMessageChannelItemWriter"
    scope="step">
  <property name="messagingOperations" ref="messagingTemplate"/>
  <property name="replyChannel" ref="replies"/>
</bean>

<int:channel id="replies">
  <int:queue/>
</int:channel>

<int-jms:message-driven-channel-adapter id="jmsReplies"
    destination-name="replies"
    channel="replies"/>
前面的配置為我們提供了一些 bean。我們使用 ActiveMQ 以及 Spring Integration 提供的入站和出站 JMS 介面卡來配置我們的訊息中介軟體。如所示,我們的 itemWriter bean(由我們的 job step 引用)使用 ChunkMessageChannelItemWriter 透過配置的中介軟體寫入 Chunk。
現在我們可以繼續進行 worker 配置,如下例所示
-
Java
-
XML
以下示例展示了 Java 中的 worker 配置
@Bean
public org.apache.activemq.ActiveMQConnectionFactory connectionFactory() {
    ActiveMQConnectionFactory factory = new ActiveMQConnectionFactory();
    factory.setBrokerURL("tcp://:61616");
    return factory;
}

/*
 * Configure inbound flow (requests coming from the manager)
 */
@Bean
public DirectChannel requests() {
    return new DirectChannel();
}

@Bean
public IntegrationFlow inboundFlow(ActiveMQConnectionFactory connectionFactory) {
    return IntegrationFlow
            .from(Jms.messageDrivenChannelAdapter(connectionFactory).destination("requests"))
            .channel(requests())
            .get();
}

/*
 * Configure outbound flow (replies going to the manager)
 */
@Bean
public DirectChannel replies() {
    return new DirectChannel();
}

@Bean
public IntegrationFlow outboundFlow(ActiveMQConnectionFactory connectionFactory) {
    return IntegrationFlow
            .from(replies())
            .handle(Jms.outboundAdapter(connectionFactory).destination("replies"))
            .get();
}

/*
 * Configure the ChunkProcessorChunkHandler
 */
@Bean
@ServiceActivator(inputChannel = "requests", outputChannel = "replies")
public ChunkProcessorChunkHandler<Integer> chunkProcessorChunkHandler() {
    ChunkProcessor<Integer> chunkProcessor
            = new SimpleChunkProcessor<>(itemProcessor(), itemWriter());
    ChunkProcessorChunkHandler<Integer> chunkProcessorChunkHandler
            = new ChunkProcessorChunkHandler<>();
    chunkProcessorChunkHandler.setChunkProcessor(chunkProcessor);
    return chunkProcessorChunkHandler;
}
以下示例展示了 XML 中的 worker 配置
<bean id="connectionFactory" class="org.apache.activemq.ActiveMQConnectionFactory">
  <property name="brokerURL" value="tcp://:61616"/>
</bean>

<int:channel id="requests"/>
<int:channel id="replies"/>

<int-jms:message-driven-channel-adapter id="incomingRequests"
    destination-name="requests"
    channel="requests"/>

<int-jms:outbound-channel-adapter id="outgoingReplies"
    destination-name="replies"
    channel="replies">
</int-jms:outbound-channel-adapter>

<int:service-activator id="serviceActivator"
    input-channel="requests"
    output-channel="replies"
    ref="chunkProcessorChunkHandler"
    method="handleChunk"/>

<bean id="chunkProcessorChunkHandler"
    class="org.springframework.batch.integration.chunk.ChunkProcessorChunkHandler">
  <property name="chunkProcessor">
    <bean class="org.springframework.batch.core.step.item.SimpleChunkProcessor">
      <property name="itemWriter">
        <bean class="io.spring.sbi.PersonItemWriter"/>
      </property>
      <property name="itemProcessor">
        <bean class="io.spring.sbi.PersonItemProcessor"/>
      </property>
    </bean>
  </property>
</bean>
這些配置項中的大多數應該看起來與管理器配置相似。Worker 不需要訪問 Spring Batch JobRepository 或實際的 job 配置檔案。主要的關注 bean 是 chunkProcessorChunkHandler。ChunkProcessorChunkHandler 的 chunkProcessor 屬性接受一個配置好的 SimpleChunkProcessor,您可以在其中提供對您的 ItemWriter(以及可選的 ItemProcessor)的引用,當 worker 從管理器接收到 Chunk 時,這些元件將在 worker 上執行。
有關更多資訊,請參閱“可伸縮性”章節中關於遠端 Chunking 的部分。
從版本 4.1 開始,Spring Batch Integration 引入了 @EnableBatchIntegration 註解,可用於簡化遠端 Chunking 設定。此註解提供了兩個可以在您的應用程式上下文中自動裝配的 bean:
-
RemoteChunkingManagerStepBuilderFactory: 配置管理器 Step -
RemoteChunkingWorkerBuilder: 配置遠端 worker 整合流程
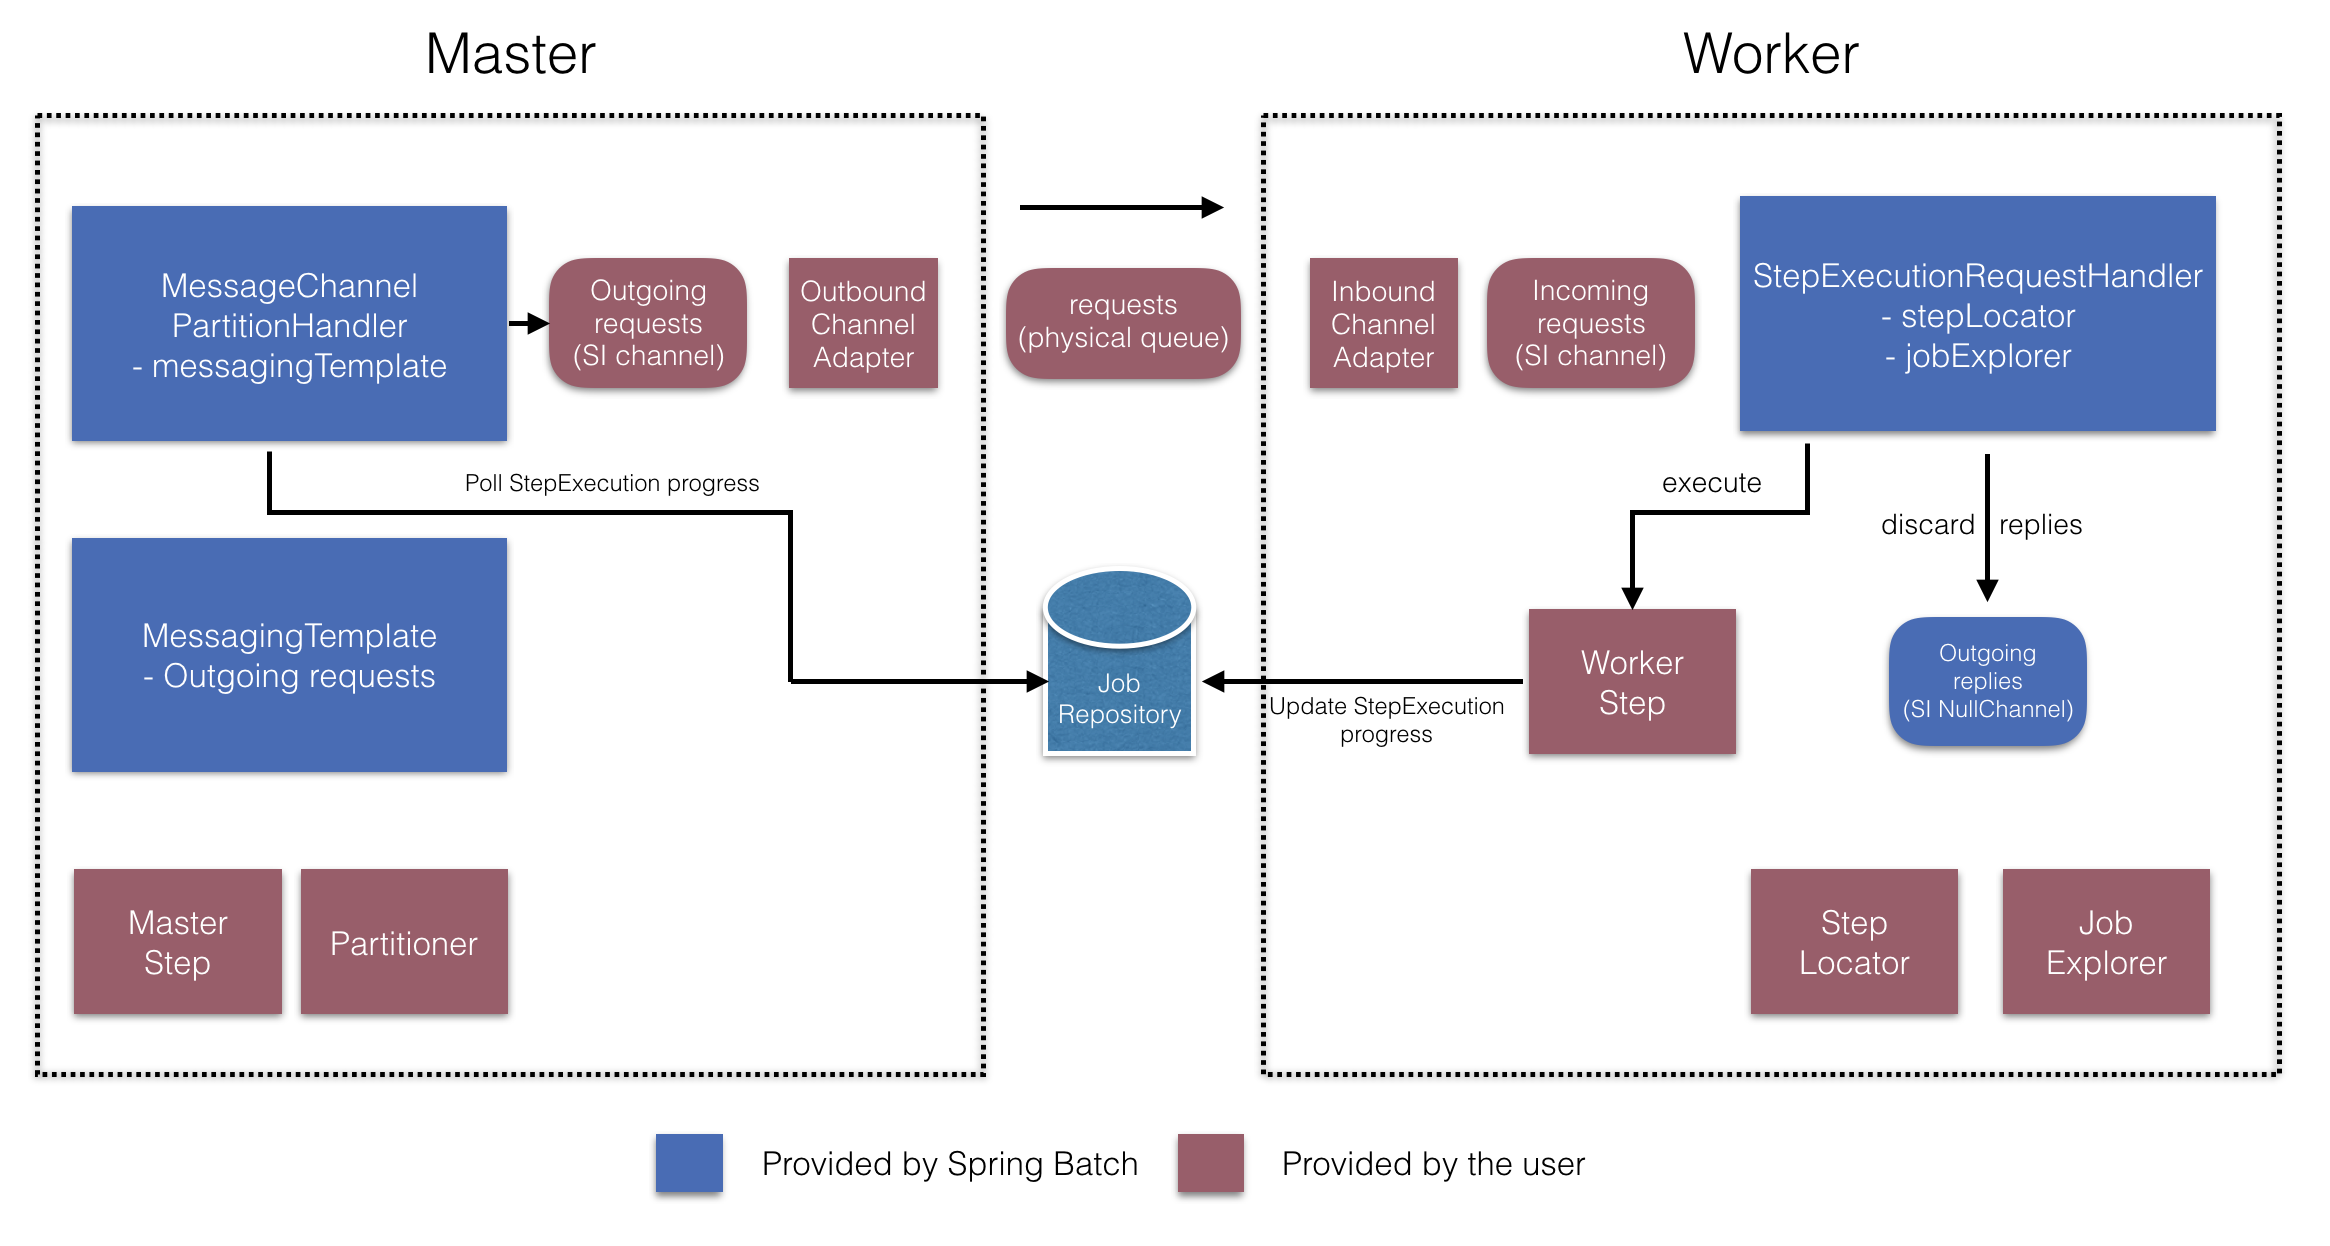
這些 API 負責配置許多元件,如下圖所示
在管理器端,RemoteChunkingManagerStepBuilderFactory 允許您透過宣告以下內容來配置管理器 Step:
-
用於讀取 Item 並將其傳送給 worker 的 Item Reader
-
用於向 worker 傳送請求的出站通道(“Outgoing requests”)
-
用於接收 worker 回覆的入站通道(“Incoming replies”)
您無需顯式配置 ChunkMessageChannelItemWriter 和 MessagingTemplate。(如果您有理由這樣做,仍然可以顯式配置它們)。
在 worker 端,RemoteChunkingWorkerBuilder 允許您配置 worker 以:
-
監聽管理器在入站通道(“Incoming requests”)上傳送的請求
-
使用配置好的
ItemProcessor和ItemWriter對每個請求呼叫ChunkProcessorChunkHandler的handleChunk方法 -
在出站通道(“Outgoing replies”)上向管理器傳送回覆
您無需顯式配置 SimpleChunkProcessor 和 ChunkProcessorChunkHandler。(如果您有理由這樣做,仍然可以顯式配置它們)。
以下示例展示瞭如何使用這些 API
@EnableBatchIntegration
@EnableBatchProcessing
public class RemoteChunkingJobConfiguration {

    @Configuration
    public static class ManagerConfiguration {

        @Autowired
        private RemoteChunkingManagerStepBuilderFactory managerStepBuilderFactory;

        @Bean
        public TaskletStep managerStep() {
            return this.managerStepBuilderFactory.get("managerStep")
                       .chunk(100)
                       .reader(itemReader())
                       .outputChannel(requests()) // requests sent to workers
                       .inputChannel(replies())   // replies received from workers
                       .build();
        }

        // Middleware beans setup omitted

    }

    @Configuration
    public static class WorkerConfiguration {

        @Autowired
        private RemoteChunkingWorkerBuilder workerBuilder;

        @Bean
        public IntegrationFlow workerFlow() {
            return this.workerBuilder
                       .itemProcessor(itemProcessor())
                       .itemWriter(itemWriter())
                       .inputChannel(requests()) // requests received from the manager
                       .outputChannel(replies()) // replies sent to the manager
                       .build();
        }

        // Middleware beans setup omitted

    }

}您可以在此處找到遠端 Chunking Job 的完整示例。
遠端 Partitioning
下圖展示了典型的遠端 Partitioning 情況
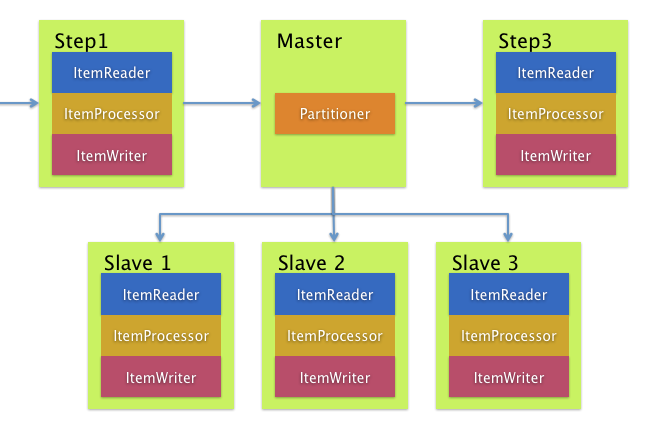
另一方面,遠端 Partitioning 在不是 Item 處理而是相關的 I/O 導致瓶頸時很有用。使用遠端 Partitioning,您可以將工作傳送給執行完整 Spring Batch Step 的 worker。因此,每個 worker 都有自己的 ItemReader、ItemProcessor 和 ItemWriter。為此,Spring Batch Integration 提供了 MessageChannelPartitionHandler。
PartitionHandler 介面的此實現使用 MessageChannel 例項向遠端 worker 傳送指令並接收其響應。這提供了一個很好的抽象,使其與用於與遠端 worker 通訊的傳輸方式(如 JMS 和 AMQP)分離。
“可伸縮性”章節中討論遠端 Partitioning 的部分概述了配置遠端 Partitioning 所需的概念和元件,並展示了使用預設 TaskExecutorPartitionHandler 在單獨的本地執行執行緒中進行 Partitioning 的示例。對於到多個 JVM 的遠端 Partitioning,還需要兩個額外的元件:
-
一個遠端呼叫框架或網格環境
-
支援所需的遠端呼叫框架或網格環境的
PartitionHandler實現
與遠端 Chunking 類似,您可以使用 JMS 作為“遠端呼叫框架”。在這種情況下,如前所述,使用 MessageChannelPartitionHandler 例項作為 PartitionHandler 實現。
-
Java
-
XML
以下示例假設存在一個已 Partitioning 的 Job,並重點介紹 Java 中的 MessageChannelPartitionHandler 和 JMS 配置
/*
 * Configuration of the manager side
 */
@Bean
public PartitionHandler partitionHandler() {
    MessageChannelPartitionHandler partitionHandler = new MessageChannelPartitionHandler();
    partitionHandler.setStepName("step1");
    partitionHandler.setGridSize(3);
    partitionHandler.setReplyChannel(outboundReplies());
    MessagingTemplate template = new MessagingTemplate();
    template.setDefaultChannel(outboundRequests());
    template.setReceiveTimeout(100000);
    partitionHandler.setMessagingOperations(template);
    return partitionHandler;
}

@Bean
public QueueChannel outboundReplies() {
    return new QueueChannel();
}

@Bean
public DirectChannel outboundRequests() {
    return new DirectChannel();
}

@Bean
public IntegrationFlow outboundJmsRequests() {
    return IntegrationFlow.from("outboundRequests")
            .handle(Jms.outboundGateway(connectionFactory())
                    .requestDestination("requestsQueue"))
            .get();
}

@Bean
@ServiceActivator(inputChannel = "inboundStaging")
public AggregatorFactoryBean partitioningMessageHandler() throws Exception {
    AggregatorFactoryBean aggregatorFactoryBean = new AggregatorFactoryBean();
    aggregatorFactoryBean.setProcessorBean(partitionHandler());
    aggregatorFactoryBean.setOutputChannel(outboundReplies());
    // configure other propeties of the aggregatorFactoryBean
    return aggregatorFactoryBean;
}

@Bean
public DirectChannel inboundStaging() {
    return new DirectChannel();
}

@Bean
public IntegrationFlow inboundJmsStaging() {
    return IntegrationFlow
            .from(Jms.messageDrivenChannelAdapter(connectionFactory())
                    .configureListenerContainer(c -> c.subscriptionDurable(false))
                    .destination("stagingQueue"))
            .channel(inboundStaging())
            .get();
}

/*
 * Configuration of the worker side
 */
@Bean
public StepExecutionRequestHandler stepExecutionRequestHandler() {
    StepExecutionRequestHandler stepExecutionRequestHandler = new StepExecutionRequestHandler();
    stepExecutionRequestHandler.setJobExplorer(jobExplorer);
    stepExecutionRequestHandler.setStepLocator(stepLocator());
    return stepExecutionRequestHandler;
}

@Bean
@ServiceActivator(inputChannel = "inboundRequests", outputChannel = "outboundStaging")
public StepExecutionRequestHandler serviceActivator() throws Exception {
    return stepExecutionRequestHandler();
}

@Bean
public DirectChannel inboundRequests() {
    return new DirectChannel();
}

public IntegrationFlow inboundJmsRequests() {
    return IntegrationFlow
            .from(Jms.messageDrivenChannelAdapter(connectionFactory())
                    .configureListenerContainer(c -> c.subscriptionDurable(false))
                    .destination("requestsQueue"))
            .channel(inboundRequests())
            .get();
}

@Bean
public DirectChannel outboundStaging() {
    return new DirectChannel();
}

@Bean
public IntegrationFlow outboundJmsStaging() {
    return IntegrationFlow.from("outboundStaging")
            .handle(Jms.outboundGateway(connectionFactory())
                    .requestDestination("stagingQueue"))
            .get();
}
以下示例假設存在一個已 Partitioning 的 Job,並重點介紹 XML 中的 MessageChannelPartitionHandler 和 JMS 配置
<bean id="partitionHandler"
   class="org.springframework.batch.integration.partition.MessageChannelPartitionHandler">
  <property name="stepName" value="step1"/>
  <property name="gridSize" value="3"/>
  <property name="replyChannel" ref="outbound-replies"/>
  <property name="messagingOperations">
    <bean class="org.springframework.integration.core.MessagingTemplate">
      <property name="defaultChannel" ref="outbound-requests"/>
      <property name="receiveTimeout" value="100000"/>
    </bean>
  </property>
</bean>

<int:channel id="outbound-requests"/>
<int-jms:outbound-channel-adapter destination="requestsQueue"
    channel="outbound-requests"/>

<int:channel id="inbound-requests"/>
<int-jms:message-driven-channel-adapter destination="requestsQueue"
    channel="inbound-requests"/>

<bean id="stepExecutionRequestHandler"
    class="org.springframework.batch.integration.partition.StepExecutionRequestHandler">
  <property name="jobExplorer" ref="jobExplorer"/>
  <property name="stepLocator" ref="stepLocator"/>
</bean>

<int:service-activator ref="stepExecutionRequestHandler" input-channel="inbound-requests"
    output-channel="outbound-staging"/>

<int:channel id="outbound-staging"/>
<int-jms:outbound-channel-adapter destination="stagingQueue"
    channel="outbound-staging"/>

<int:channel id="inbound-staging"/>
<int-jms:message-driven-channel-adapter destination="stagingQueue"
    channel="inbound-staging"/>

<int:aggregator ref="partitionHandler" input-channel="inbound-staging"
    output-channel="outbound-replies"/>

<int:channel id="outbound-replies">
  <int:queue/>
</int:channel>

<bean id="stepLocator"
    class="org.springframework.batch.integration.partition.BeanFactoryStepLocator" />
您還必須確保 Partition 的 handler 屬性對映到 partitionHandler bean。
-
Java
-
XML
以下示例展示瞭如何將 Java 中的 Partition handler 屬性對映到 partitionHandler
	public Job personJob(JobRepository jobRepository) {
		return new JobBuilder("personJob", jobRepository)
				.start(new StepBuilder("step1.manager", jobRepository)
						.partitioner("step1.worker", partitioner())
						.partitionHandler(partitionHandler())
						.build())
				.build();
	}
以下示例展示瞭如何將 XML 中的 Partition handler 屬性對映到 partitionHandler
<job id="personJob">
  <step id="step1.manager">
    <partition partitioner="partitioner" handler="partitionHandler"/>
    ...
  </step>
</job>您可以在此處找到遠端 Partitioning Job 的完整示例。
您可以使用 @EnableBatchIntegration 註解來簡化遠端 Partitioning 設定。此註解提供了兩個對遠端 Partitioning 有用的 bean:
-
RemotePartitioningManagerStepBuilderFactory: 配置管理器 Step -
RemotePartitioningWorkerStepBuilderFactory: 配置 worker Step
這些 API 負責配置許多元件,如下圖所示
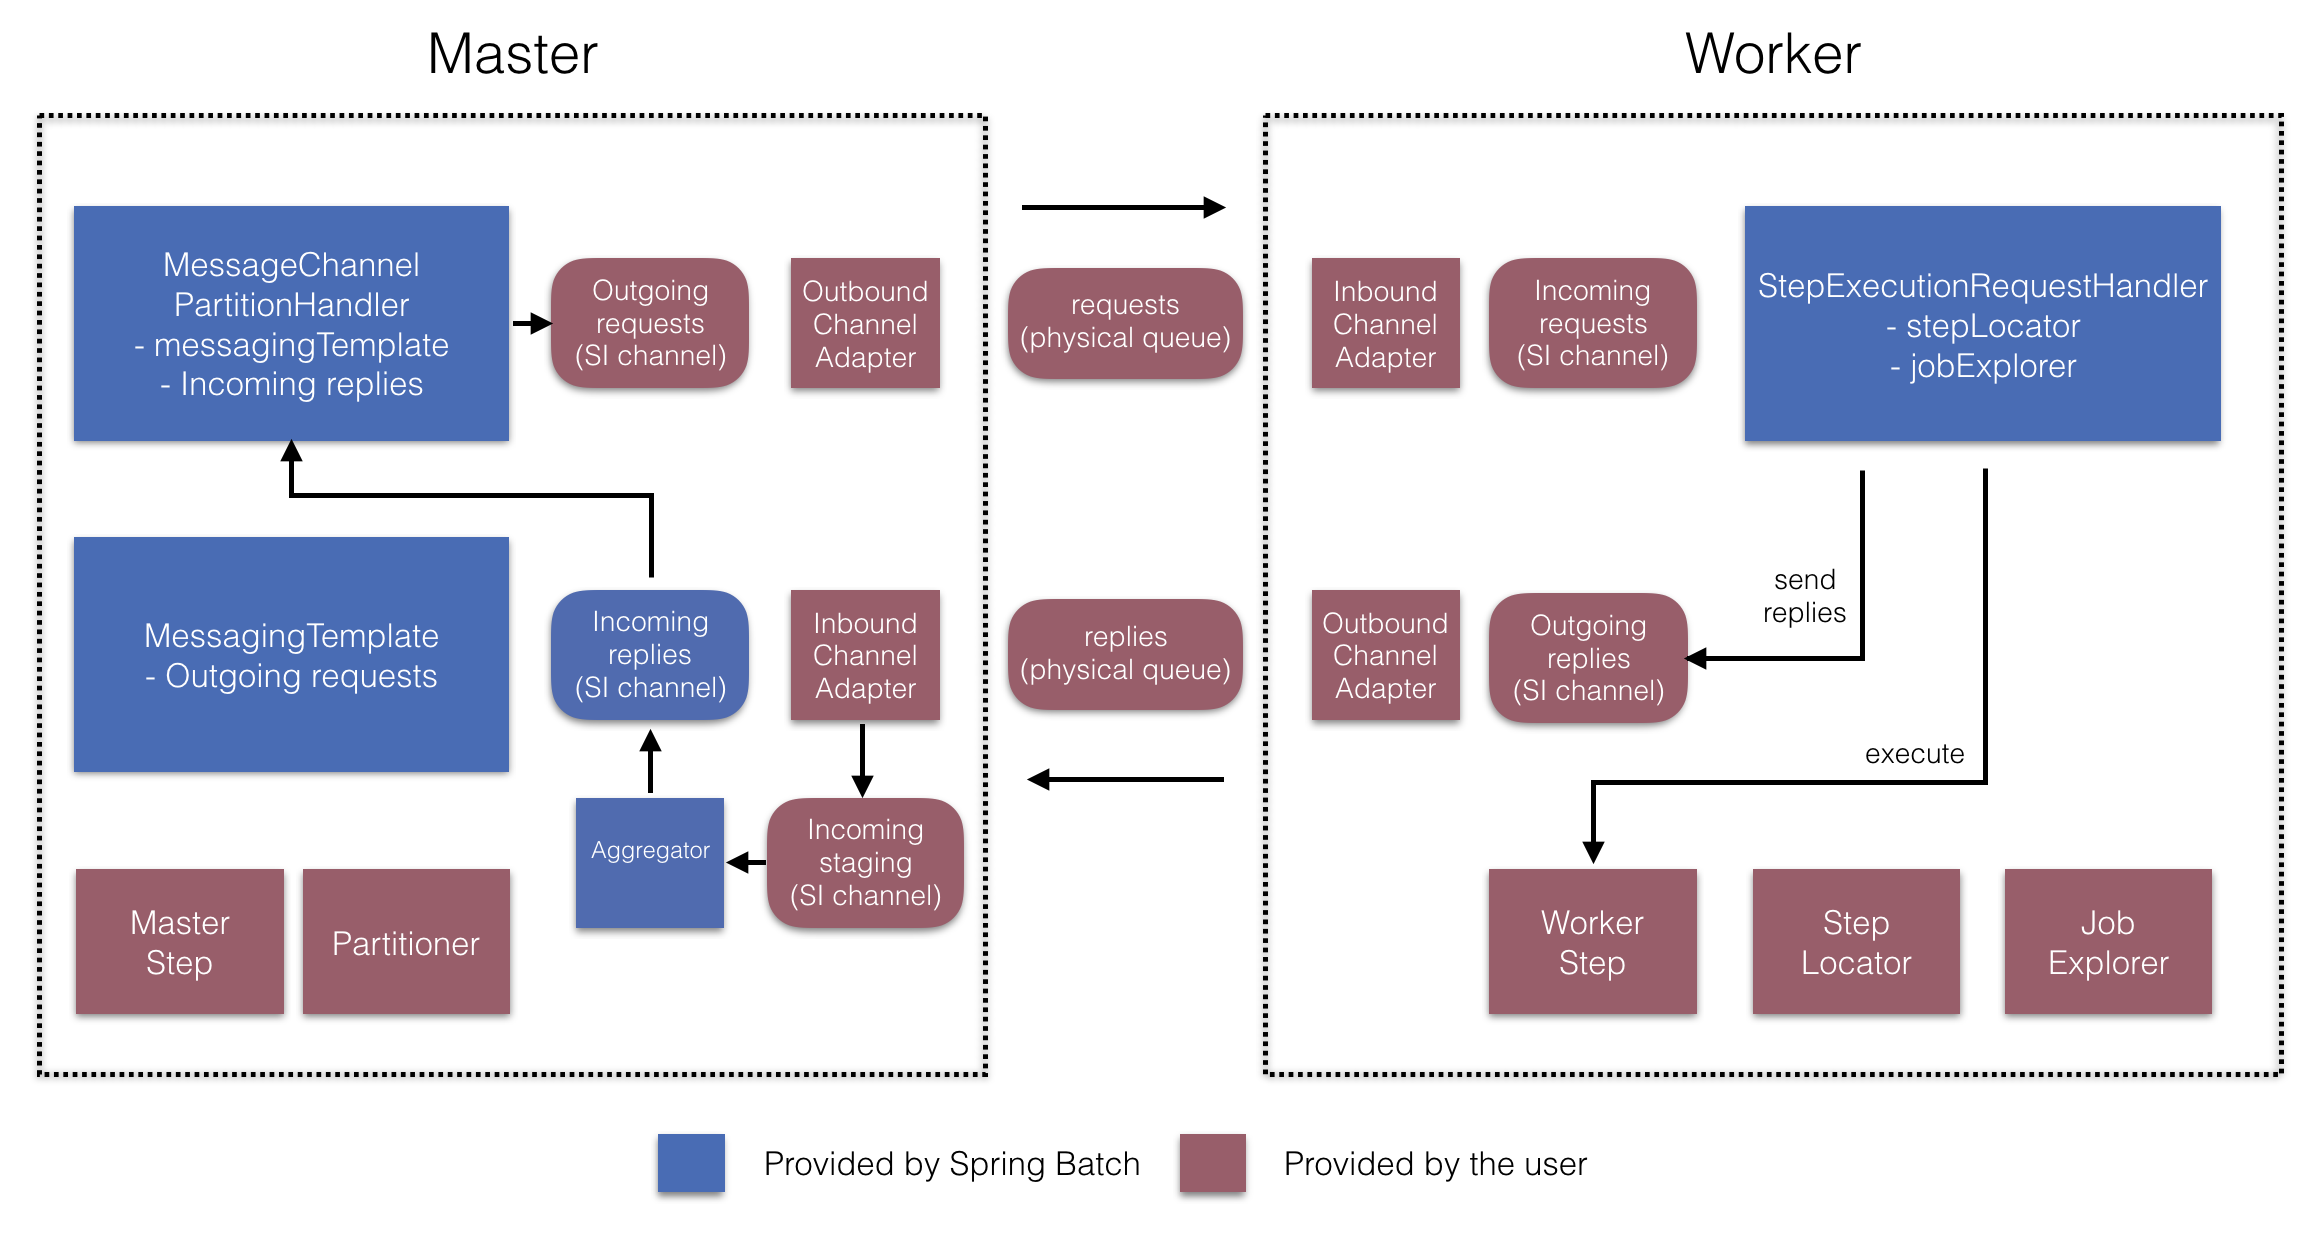
在管理器端,RemotePartitioningManagerStepBuilderFactory 允許您透過宣告以下內容來配置管理器 Step:
-
用於 Partition 資料的
Partitioner -
用於向 worker 傳送請求的出站通道(“Outgoing requests”)
-
用於接收 worker 回覆的入站通道(“Incoming replies”)(配置回覆聚合時)
-
輪詢間隔和超時引數(配置 Job 倉庫輪詢時)
您無需顯式配置 MessageChannelPartitionHandler 和 MessagingTemplate。(如果您有理由這樣做,仍然可以顯式配置它們)。
在 worker 端,RemotePartitioningWorkerStepBuilderFactory 允許您配置 worker 以:
-
監聽管理器在入站通道(“Incoming requests”)上傳送的請求
-
對每個請求呼叫
StepExecutionRequestHandler的handle方法 -
在出站通道(“Outgoing replies”)上向管理器傳送回覆
您無需顯式配置 StepExecutionRequestHandler。(如果您有理由這樣做,仍然可以顯式配置它)。
以下示例展示瞭如何使用這些 API
@Configuration
@EnableBatchProcessing
@EnableBatchIntegration
public class RemotePartitioningJobConfiguration {

    @Configuration
    public static class ManagerConfiguration {

        @Autowired
        private RemotePartitioningManagerStepBuilderFactory managerStepBuilderFactory;

        @Bean
        public Step managerStep() {
                 return this.managerStepBuilderFactory
                    .get("managerStep")
                    .partitioner("workerStep", partitioner())
                    .gridSize(10)
                    .outputChannel(outgoingRequestsToWorkers())
                    .inputChannel(incomingRepliesFromWorkers())
                    .build();
        }

        // Middleware beans setup omitted

    }

    @Configuration
    public static class WorkerConfiguration {

        @Autowired
        private RemotePartitioningWorkerStepBuilderFactory workerStepBuilderFactory;

        @Bean
        public Step workerStep() {
                 return this.workerStepBuilderFactory
                    .get("workerStep")
                    .inputChannel(incomingRequestsFromManager())
                    .outputChannel(outgoingRepliesToManager())
                    .chunk(100)
                    .reader(itemReader())
                    .processor(itemProcessor())
                    .writer(itemWriter())
                    .build();
        }

        // Middleware beans setup omitted

    }

}
