使用 REST Docs
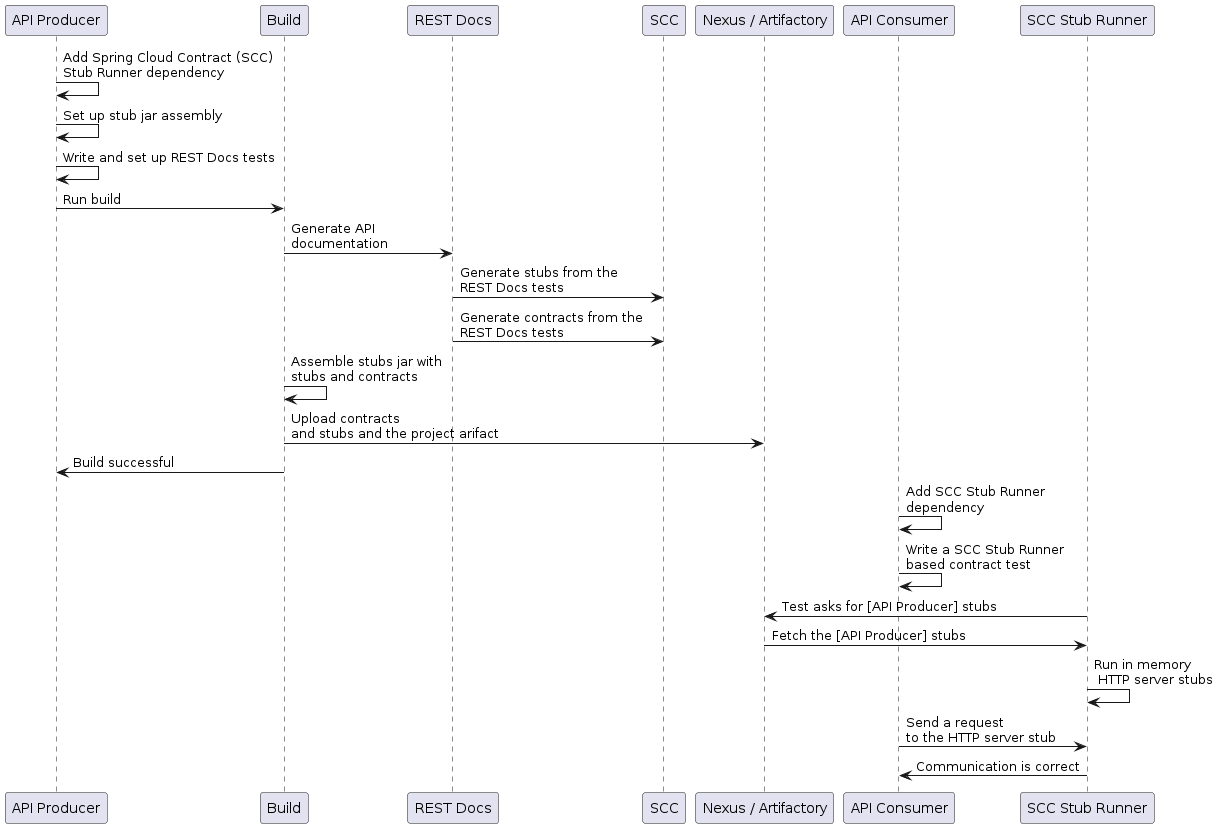
您可以使用 Spring REST Docs 為 HTTP API 生成文件(例如,採用 Asciidoc 格式),使用 Spring MockMvc 或 WebTestClient。在為 API 生成文件的同時,您還可以使用 Spring Cloud Contract WireMock 生成 WireMock 存根。為此,編寫您的常規 REST Docs 測試用例,並使用 @AutoConfigureRestDocs 自動在 REST Docs 輸出目錄中生成存根。以下 UML 圖顯示了 REST Docs 的流程
以下示例使用 MockMvc
@RunWith(SpringRunner.class)
@SpringBootTest
@AutoConfigureRestDocs(outputDir = "target/snippets")
@AutoConfigureMockMvc
public class ApplicationTests {

	@Autowired
	private MockMvc mockMvc;

	@Test
	public void contextLoads() throws Exception {
		mockMvc.perform(get("/resource"))
				.andExpect(content().string("Hello World"))
				.andDo(document("resource"));
	}
}
此測試會在 target/snippets/stubs/resource.json 生成一個 WireMock 存根。它匹配所有對 /resource 路徑的 GET 請求。使用 WebTestClient(用於測試 Spring WebFlux 應用程式)的相同示例如下
@RunWith(SpringRunner.class)
@SpringBootTest
@AutoConfigureRestDocs(outputDir = "target/snippets")
@AutoConfigureWebTestClient
public class ApplicationTests {

	@Autowired
	private WebTestClient client;

	@Test
	public void contextLoads() throws Exception {
		client.get().uri("/resource").exchange()
				.expectBody(String.class).isEqualTo("Hello World")
 				.consumeWith(document("resource"));
	}
}
在沒有任何額外配置的情況下,這些測試會建立一個存根,其中包含一個用於 HTTP 方法和除 host 和 content-length 之外的所有請求頭的請求匹配器。要更精確地匹配請求(例如,匹配 POST 或 PUT 的請求體),我們需要顯式地建立一個請求匹配器。這樣做有兩個效果
-
建立一個僅以您指定的方式進行匹配的存根。
-
斷言測試用例中的請求也匹配相同的條件。
此功能的主要入口點是 WireMockRestDocs.verify(),它可以替代 document() 便利方法,示例如下
import static org.springframework.cloud.contract.wiremock.restdocs.WireMockRestDocs.verify;

@RunWith(SpringRunner.class)
@SpringBootTest
@AutoConfigureRestDocs(outputDir = "target/snippets")
@AutoConfigureMockMvc
public class ApplicationTests {

	@Autowired
	private MockMvc mockMvc;

	@Test
	public void contextLoads() throws Exception {
		mockMvc.perform(post("/resource")
                .content("{\"id\":\"123456\",\"message\":\"Hello World\"}"))
				.andExpect(status().isOk())
				.andDo(verify().jsonPath("$.id"))
				.andDo(document("resource"));
	}
}
上述契約指定任何包含 id 欄位的有效 POST 請求都會收到此測試中定義的響應。您可以將 .jsonPath() 的呼叫鏈式連線起來以新增額外的匹配器。如果您不熟悉 JSON Path,JayWay 文件可以幫助您快速上手。此測試的 WebTestClient 版本具有類似的 verify() 靜態輔助方法,您可以將其插入到相同的位置。
除了 jsonPath 和 contentType 便捷方法之外,您還可以使用 WireMock API 來驗證請求是否與建立的存根匹配,示例如下
@Test
public void contextLoads() throws Exception {
	mockMvc.perform(post("/resource")
               .content("{\"id\":\"123456\",\"message\":\"Hello World\"}"))
			.andExpect(status().isOk())
			.andDo(verify()
					.wiremock(WireMock.post(urlPathEquals("/resource"))
					.withRequestBody(matchingJsonPath("$.id"))
					.andDo(document("post-resource"))));
}
WireMock API 功能豐富。您可以透過正則表示式以及 JSON 路徑來匹配請求頭、查詢引數和請求體。您可以使用這些功能建立具有更廣泛引數範圍的存根。上面的示例生成了一個類似於下面示例的存根
{
  "request" : {
    "url" : "/resource",
    "method" : "POST",
    "bodyPatterns" : [ {
      "matchesJsonPath" : "$.id"
    }]
  },
  "response" : {
    "status" : 200,
    "body" : "Hello World",
    "headers" : {
      "X-Application-Context" : "application:-1",
      "Content-Type" : "text/plain"
    }
  }
}
您可以使用 wiremock() 方法或 jsonPath() 和 contentType() 方法來建立請求匹配器,但不能同時使用這兩種方法。 |
在消費者端,您可以將本節前面生成的 resource.json 檔案在類路徑上可用(例如,透過將存根釋出為 JAR)。之後,您可以透過多種不同方式建立使用 WireMock 的存根,包括使用 @AutoConfigureWireMock(stubs="classpath:resource.json"),如本文件前面所述。
| 在 Spring Cloud Contract 5.0.x 中,對 Spring Rest Docs 中 Rest Assured 的支援已移除,原因是 Rest Assured 與 Groovy 5 不相容。 |
使用 REST Docs 生成契約
您還可以使用 Spring REST Docs 生成 Spring Cloud Contract DSL 檔案和文件。如果將其與 Spring Cloud WireMock 結合使用,您將同時獲得契約和存根。
您為什麼要使用此功能?社群中的一些人提出了一個問題,他們希望轉向基於 DSL 的契約定義,但他們已經有很多 Spring MVC 測試。使用此功能可以生成契約檔案,您可以稍後修改並將它們移動到(您的配置中定義的)資料夾中,以便外掛找到它們。
| 您可能想知道為什麼此功能在 WireMock 模組中。此功能在那裡是因為生成契約和存根都是有意義的。 |
考慮以下測試
		this.mockMvc
			.perform(post("/foo").accept(MediaType.APPLICATION_PDF)
				.accept(MediaType.APPLICATION_JSON)
				.contentType(MediaType.APPLICATION_JSON)
				.content("{\"foo\": 23, \"bar\" : \"baz\" }"))
			.andExpect(status().isOk())
			.andExpect(content().string("bar"))
			// first WireMock
			.andDo(WireMockRestDocs.verify()
				.jsonPath("$[?(@.foo >= 20)]")
				.jsonPath("$[?(@.bar in ['baz','bazz','bazzz'])]")
				.contentType(MediaType.valueOf("application/json")))
			// then Contract DSL documentation
			.andDo(document("index", SpringCloudContractRestDocs.dslContract(Maps.of("priority", 1))));
上述測試建立了上一節中介紹的存根,同時生成了契約和文件檔案。
契約名為 index.groovy,可能類似於以下示例
import org.springframework.cloud.contract.spec.Contract

Contract.make {
    request {
        method 'POST'
        url '/foo'
        body('''
            {"foo": 23 }
        ''')
        headers {
            header('''Accept''', '''application/json''')
            header('''Content-Type''', '''application/json''')
        }
    }
    response {
        status OK()
        body('''
        bar
        ''')
        headers {
            header('''Content-Type''', '''application/json;charset=UTF-8''')
            header('''Content-Length''', '''3''')
        }
        bodyMatchers {
            jsonPath('$[?(@.foo >= 20)]', byType())
        }
    }
}
生成的文件(在本例中採用 Asciidoc 格式)包含一個格式化的契約。此檔案的位置將是 index/dsl-contract.adoc。
指定優先順序屬性
方法 SpringCloudContractRestDocs.dslContract() 接受一個可選的 Map 引數,允許您在模板中指定額外的屬性。
其中一個屬性是優先順序欄位,您可以按如下方式指定
SpringCloudContractRestDocs.dslContract(Map.of("priority", 1))覆蓋 DSL 契約模板
預設情況下,契約的輸出基於名為 default-dsl-contract-only.snippet 的檔案。
您可以提供一個自定義模板檔案,方法是覆蓋 getTemplate() 方法,如下所示
new ContractDslSnippet(){
    @Override
    protected String getTemplate() {
        return "custom-dsl-contract";
    }
}));
所以上面顯示這一行的例子
.andDo(document("index", SpringCloudContractRestDocs.dslContract()));應改為
.andDo(document("index", new ContractDslSnippet(){
                            @Override
                            protected String getTemplate() {
                                return "custom-dsl-template";
                            }
                        }));
模板透過在類路徑上查詢資源來解析。按順序檢查以下位置
-
org/springframework/restdocs/templates/${templateFormatId}/${name}.snippet -
org/springframework/restdocs/templates/${name}.snippet -
org/springframework/restdocs/templates/${templateFormatId}/default-${name}.snippet
因此,在上面的例子中,您應該將一個名為 custom-dsl-template.snippet 的檔案放置在 src/test/resources/org/springframework/restdocs/templates/custom-dsl-template.snippet 中

