如何使用通用倉庫來儲存契約,而不是將它們與生產者一起儲存?
儲存合同的另一種方式,而不是與生產者一起儲存,是將其儲存在一個公共位置。這種情況可能與安全問題有關(消費者無法克隆生產者的程式碼)。此外,如果您將合同儲存在一個位置,那麼作為生產者,您將知道有多少消費者以及您的本地更改可能會破壞哪些消費者。
倉庫結構
假設我們有一個座標為 com.example:server 的生產者和三個消費者:client1、client2 和 client3。那麼,在具有通用合同的倉庫中,您可以進行以下設定(您可以在 Spring Cloud Contract 的倉庫 samples/standalone/contracts 子資料夾中檢視)。以下列表顯示了這種結構
├── com
│   └── example
│       └── server
│           ├── client1
│           │   └── expectation.groovy
│           ├── client2
│           │   └── expectation.groovy
│           ├── client3
│           │   └── expectation.groovy
│           └── pom.xml
├── mvnw
├── mvnw.cmd
├── pom.xml
└── src
    └── assembly
        └── contracts.xml
在以斜槓分隔的 groupid/artifact id 資料夾 (com/example/server) 下,您有三個消費者 (client1、client2 和 client3) 的預期。預期是標準的 Groovy DSL 合同檔案,如本文件所述。此倉庫必須生成一個 JAR 檔案,該檔案與倉庫的內容一對一對映。
以下示例顯示了 server 資料夾中的 pom.xml 檔案
除了 Spring Cloud Contract Maven 外掛外,沒有其他依賴項。這些 pom.xml 檔案對於消費者端執行 mvn clean install -DskipTests 以本地安裝生產者專案的存根是必要的。
根資料夾中的 pom.xml 檔案可以如下所示
它使用 assembly 外掛構建包含所有合同的 JAR。以下示例顯示了這種設定
工作流
工作流假設 Spring Cloud Contract 在消費者和生產者端都已設定。在包含合同的通用倉庫中也存在適當的外掛設定。CI 作業已設定為通用倉庫構建所有合同的構件並將其上傳到 Nexus 或 Artifactory。下圖顯示了此工作流的 UML
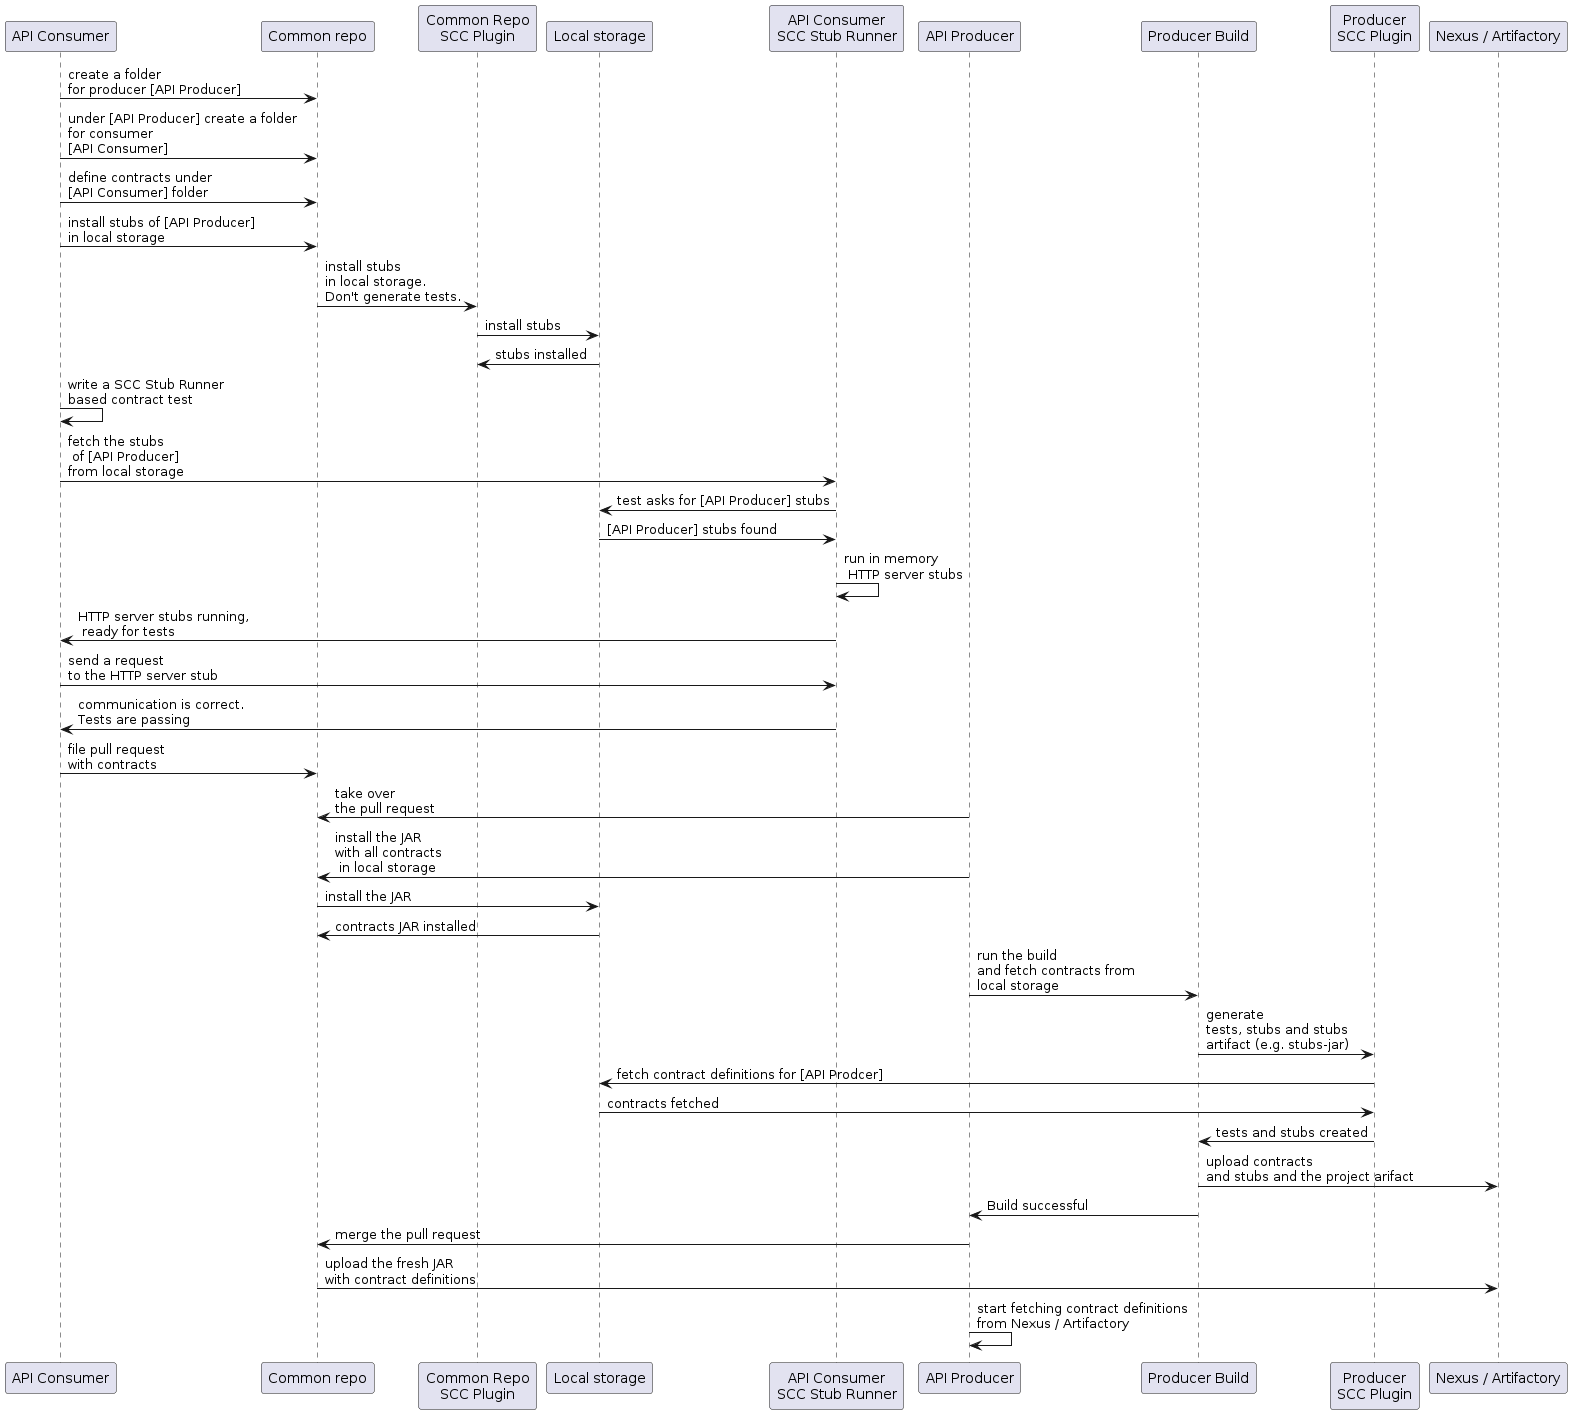
消費者
當消費者想要離線處理合同時,消費者團隊無需克隆生產者程式碼,而是克隆通用倉庫,進入所需的生產者資料夾(例如,com/example/server),並執行 mvn clean install -DskipTests 以本地安裝從合同轉換而來的存根。
| 您需要在本地安裝 Maven。 |
生產者
作為生產者,您可以修改 Spring Cloud Contract Verifier 以提供包含合同的 JAR 的 URL 和依賴項,如下所示
<plugin>
	<groupId>org.springframework.cloud</groupId>
	<artifactId>spring-cloud-contract-maven-plugin</artifactId>
	<configuration>
		<contractsMode>REMOTE</contractsMode>
		<contractsRepositoryUrl>
			https://link/to/your/nexus/or/artifactory/or/sth
		</contractsRepositoryUrl>
		<contractDependency>
			<groupId>com.example.standalone</groupId>
			<artifactId>contracts</artifactId>
		</contractDependency>
	</configuration>
</plugin>
透過此設定,將從 link/to/your/nexus/or/artifactory/or/sth 下載 groupid 為 com.example.standalone 且 artifactid 為 contracts 的 JAR。然後將其解壓到本地臨時資料夾中,並選擇 com/example/server 中存在的合同作為用於生成測試和存根的合同。由於此約定,生產者團隊可以知道在進行一些不相容更改時哪些消費者團隊被破壞了。
其餘流程看起來相同。
如何按主題而非按生產者定義訊息合同?
為了避免在通用倉庫中重複訊息合同,當幾個生產者向一個主題寫入訊息時,我們可以建立一個結構,其中 REST 合同按生產者放在資料夾中,訊息合同按主題放在資料夾中。
對於 Maven 專案
為了在生產者端工作,我們應該指定一個包含模式,用於按我們感興趣的訊息主題過濾通用倉庫 JAR 檔案。Maven Spring Cloud Contract 外掛的 includedFiles 屬性允許我們這樣做。此外,還需要指定 contractsPath,因為預設路徑將是通用倉庫的 groupid/artifactid。以下示例顯示了 Spring Cloud Contract 的 Maven 外掛
<plugin>
   <groupId>org.springframework.cloud</groupId>
   <artifactId>spring-cloud-contract-maven-plugin</artifactId>
   <version>${spring-cloud-contract.version}</version>
   <configuration>
      <contractsMode>REMOTE</contractsMode>
      <contractsRepositoryUrl>https://link/to/your/nexus/or/artifactory/or/sth</contractsRepositoryUrl>
      <contractDependency>
         <groupId>com.example</groupId>
         <artifactId>common-repo-with-contracts</artifactId>
         <version>+</version>
      </contractDependency>
      <contractsPath>/</contractsPath>
      <baseClassMappings>
         <baseClassMapping>
            <contractPackageRegex>.*messaging.*</contractPackageRegex>
            <baseClassFQN>com.example.services.MessagingBase</baseClassFQN>
         </baseClassMapping>
         <baseClassMapping>
            <contractPackageRegex>.*rest.*</contractPackageRegex>
            <baseClassFQN>com.example.services.TestBase</baseClassFQN>
         </baseClassMapping>
      </baseClassMappings>
      <includedFiles>
         <includedFile>**/${project.artifactId}/**</includedFile>
         <includedFile>**/${first-topic}/**</includedFile>
         <includedFile>**/${second-topic}/**</includedFile>
      </includedFiles>
   </configuration>
</plugin>| 前面 Maven 外掛中的許多值都可以更改。我們將其包含在內是為了說明目的,而不是試圖提供一個“典型”示例。 |
對於 Gradle 專案
要使用 Gradle 專案
-
為通用倉庫依賴項新增自定義配置,如下所示
ext { contractsGroupId = "com.example" contractsArtifactId = "common-repo" contractsVersion = "1.2.3" } configurations { contracts { transitive = false } } -
將通用倉庫依賴項新增到您的類路徑中,如下所示
dependencies { contracts "${contractsGroupId}:${contractsArtifactId}:${contractsVersion}" testCompile "${contractsGroupId}:${contractsArtifactId}:${contractsVersion}" } -
將依賴項下載到適當的資料夾,如下所示
task getContracts(type: Copy) { from configurations.contracts into new File(project.buildDir, "downloadedContracts") } -
解壓縮 JAR,如下所示
task unzipContracts(type: Copy) { def zipFile = new File(project.buildDir, "downloadedContracts/${contractsArtifactId}-${contractsVersion}.jar") def outputDir = file("${buildDir}/unpackedContracts") from zipTree(zipFile) into outputDir } -
清理未使用的合同,如下所示
task deleteUnwantedContracts(type: Delete) { delete fileTree(dir: "${buildDir}/unpackedContracts", include: "**/*", excludes: [ "**/${project.name}/**"", "**/${first-topic}/**", "**/${second-topic}/**"]) } -
建立任務依賴項,如下所示
unzipContracts.dependsOn("getContracts") deleteUnwantedContracts.dependsOn("unzipContracts") build.dependsOn("deleteUnwantedContracts") -
透過設定
contractsDslDir屬性配置外掛,指定包含合同的目錄,如下所示contracts { contractsDslDir = new File("${buildDir}/unpackedContracts") }

